

Starfield Mantis quest: Secret floor code puzzle answer, walkthrough & rewards
If you're wondering how to start the Mantis sidequest in Starfield, or how to solve the floor code puzzle it presents, we have all the information you need.
This is part of the ‘Starfield’ directory
Directory contents
-
Planet Rover
-
Match Look & Aim Sens
-
Best Controller Settings
-
Best Mouse & Keyboard Settings
-
Best Outpost Planets
-
Best Graphics Settings
-
Console Commands
-
Flashlights
-
Fix Suit Protection
-
Fuel Generator
-
Cheap Ammo
-
Pick Up, Move, Throw Items
-
Change Appearance
-
Hide Helmet
-
Remove Bounties
-
Remove Traits
-
Respec
-
Wait & Pass Time
-
Jail
-
Persuasion Explained
-
Starborn Explained
-
Level Up Fast
-
Outpost Transfer Containers
-
Transmog
An early quest in Starfield has you investigating the secret base of a covert operative known as The Mantis - and there’s a pesky puzzle involving a secret floor code to solve.
Starfield may be a brand-new game, but it still holds plenty of that classic Bethesda RPG formula. There are plenty of side quests to take on, many of which will see you investigating far-off planets and space stations for epic loot and adventures.
One such adventure is the Mantis questline, which can be started fairly early on in your playthrough. Here’s everything you need to know about how to start the Mantis quest, as well as how to solve the floor code puzzle and what rewards you can expect to earn.
- Here's what you need to know about all the console commands and item IDs in Starfield
SPOILER WARNING: The following guide will include major spoilers for the Mantis side quest in Starfield.
How to start Mantis quest in Starfield
The Mantis questline in Starfield is much like the Meridia’s Beacon quest in Skyrim, as it involves picking up an item that no one is quite sure where they first acquired.
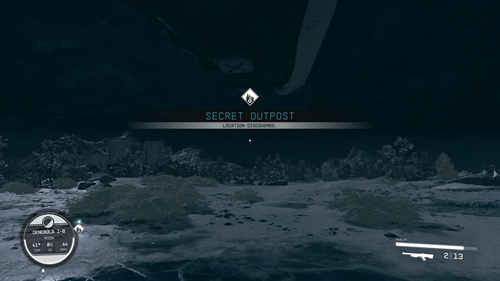
To start this quest, you’ll first need to find a data slat that’s titled “Secret Outpost!”. We’re pretty sure that we looted this from a random Spacer enemy early on in our playthrough, so if you haven’t found it yet, keep playing through Starfield and be sure to loot all the enemies you can.
Once acquired, head to your inventory and listen to the data slate to add the Mantis quest to your Log. Now, you’ll be able to plot a route to Denebola I-B in the Denebola system. You may need to jump to a bunch of other systems first if you haven’t upgraded your ship quite enough yet.
It’s also worth noting that, while you can start the Mantis quest quite early on in Starfield, Denebola I-B is a Level 30 planet. As such, you will encounter quite a few high-level enemies that can wipe the floor with you in one or two hits.
We managed to complete this quest at Level 8, but it was a helluva challenge and involved lots of saving and reloading. It’s a good idea to take a companion with you that’s good in combat. We took Sam Coe, which made our experience a lot easier.
- You may need to power up your Grav Drive to reach Denebola I-B in Starfield
How to find the Mantis base in Starfield
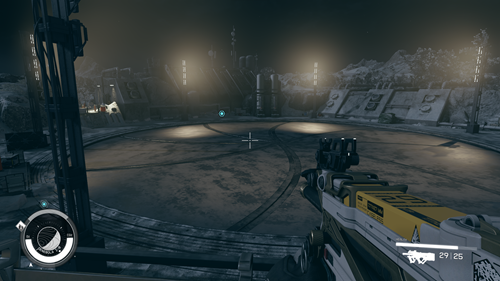
Once you’ve landed on Denebola I-B, you’ll see a 3D map marker that will guide you to the entrance of the Mantis base. You’ll need to take out a few spacers on the way, although they aren’t too tricky to take down just yet.
Once inside, you’ll need to navigate the darkened corridors, taking out more spacers as you go. Eventually, you’ll reach an open room with a Spacer named Livvey who seems to surrender. You can choose to either keep him around or kill him. Whatever you choose won’t affect the outcome of the quest, so you can do with him what you like.
How to solve the Mantis floor code puzzle in Starfield
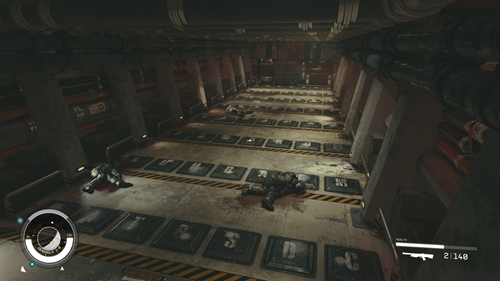
Shortly after, you’ll come across a wide corridor that has a set of pressure pads marked with letters. To solve this puzzle, you’ll need to figure out the passcode and step on each of the letter pressure plates in order.
The Mantis code is a little tricky to figure out, but if you’ve been listening to the audio logs you should have looted on the way through the Mantis base, it’s simple to decipher once you know it.
The Mantis’s son is the person leaving these voice notes, and at the end of one of them, he remarks how his mother once signed off a letter with “Sic Semper Tyrannis”. With a little bit of deciphering, the code to get through the Mantis base floor puzzle is TYRANNIS.
Now, all you have to do is stand on each of the letters in the advancing rows to spell out the word TYRANNIS. Take your time with this, as stepping on the wrong key will trigger a bunch of turrets to activate, which will blast you into next year.
Once you’re at the end of the corridor, press the button to open the gate, and you’re through to the next part of the Starfield Mantis base.
- Here's what you need to know about the Dream Home trait in Starfield
All Mantis base quest rewards in Starfield
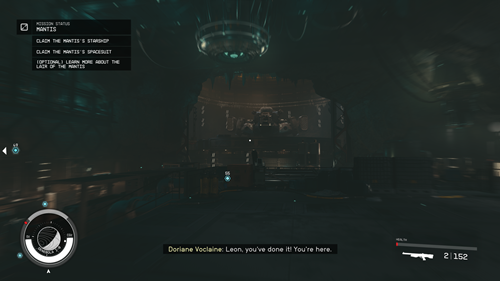
While the Mantis floor code puzzle is out of the way, there’s a little further to go until you reach the end of the quest.
A few more corridors house some powerful turrets and a couple of high-level robots, each of which is particularly tricky to take down if you’re a low level. Take your time and corner-peek each enemy, letting your companion do much of the hard work here.
Eventually, you’ll reach a massive open cavern that houses your quest rewards - and they’re pretty huge. Firstly, you’re able to inherit the Mantis ship, a powerful starship that comes complete with a shielded cargo hold (perfect for smuggling) and an armoury. It’s a massive upgrade over your first starter ship - and looks pretty wicked, too.
Before leaving the Mantis base, be sure to press the button next to it that lifts it up to the surface. This will let you claim it for your own once you also return to the planet’s surface.
Also in this area, you’ll find a complete set of the Mantis spacesuit, including the Mirrored Mantis Spacesuit, Headhunter's Mantis Space Helmet, and Assisted Carry Mantis Pack. Again, this is pretty high-level gear to be looting early on in Starfield, so it’s absolutely worth seeking out this quest if you haven’t already.
After you’re done in this room, head back to the main entrance where you entered the cavern and look for an elevator right in front of you. This will take you right back to the very start of the Mantis base, and you can leave the way you came in to continue your Starfield adventure.
That’s everything you need to know about the Mantis quest in Starfield, including how to start it, how to solve the floor code puzzle, and all the rewards you can get.
Keep reading GGRecon for more Starfield guides.

About The Author
Joshua Boyles
Joshua is the Guides Editor at GGRecon. After graduating with a BA (Hons) degree in Broadcast Journalism, he previously wrote for publications such as FragHero and GameByte. You can often find him diving deep into fantasy RPGs such as Skyrim and The Witcher, or tearing it up in Call of Duty and Battlefield. He's also often spotted hiking in the wilderness, usually blasting Arctic Monkeys.
This is part of the ‘Starfield’ directory
Directory contents
-
Planet Rover
-
Match Look & Aim Sens
-
Best Controller Settings
-
Best Mouse & Keyboard Settings
-
Best Outpost Planets
-
Best Graphics Settings
-
Console Commands
-
Flashlights
-
Fix Suit Protection
-
Fuel Generator
-
Cheap Ammo
-
Pick Up, Move, Throw Items
-
Change Appearance
-
Hide Helmet
-
Remove Bounties
-
Remove Traits
-
Respec
-
Wait & Pass Time
-
Jail
-
Persuasion Explained
-
Starborn Explained
-
Level Up Fast
-
Outpost Transfer Containers
-
Transmog


