

Destiny 2 Operation Seraph's Shield Walkthrough
Operation Seraph Shield is a tough but very fun new mission in Destiny 2, and a big part of the Season of the Seraph story.
This is part of the ‘Destiny’ directory
Directory contents
-
Seasonal Artifact Mods
-
All Exotic Weapons & Armour
-
Best Prismatic builds
-
Campaign Mission List
-
Convalescence: Budding
-
Ending Explained
-
Episode Echoes Act 1
-
Episode Heresy Explained
-
Episode Revenant Explained
-
Ergo Sum Exotic
-
Every Prismatic Aspect, Fragment & Ability
-
Red Death Reformed
-
Wild Card Mission
-
All DLC & Expansions
-
Solstice 2024
Destiny 2 Operation Seraph's Shield is the latest chapter in the Season of the Seraph storyline. Destiny 2 has Guardians delving deep into the history of the Seraphs and the Brays, all in order to restore Rasputin. Operation Seraph's Shield takes us to an orbital station above the Last City to recover more secrets and technology. To help you through it, here is our walkthrough of Destiny 2 Operation Seraph's Shield.
- For this mission, particularly if you are playing solo, we cannot recommend Destiny 2 Gyrfalcon's Hauberk enough.
Destiny 2 Operation Seraph's Shield: Getting Off The Ground
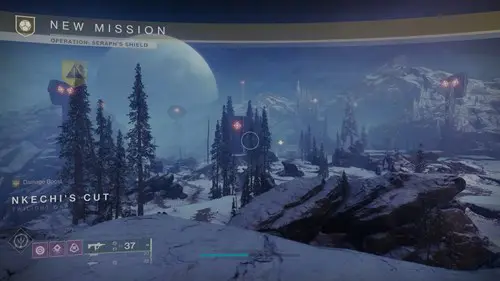
As with the previous weekly missions, Seraph's Shield begins at Nkechi's Cut in the Twilight Gap. You need to make your way across the snowfield, keeping out of the line of sight of the security towers. This time, you are headed for the main entrance, to the right of the entrances used in previous missions. There are many more Hive here this time to get in your way, so be prepared for them.
Going as the crow flies is a good idea here, so long as you are quick you can run directly toward the entrance, using the rocks for cover. You will need to deal with a couple of Knights and some Thrall, but they can be avoided. Your main opposition is the Ogre standing directly in front of the door. You will be able to see it a long time before it sees you, so take it out from a distance if you can.
Once you are inside the facility, continue through the entrance, then through the cave, and be wary of the laser traps as you re-enter the interior. They are on almost every door you go through, and they will kill you if you touch them. Once you reach the launch centre, you will meet more enemies, this time from the House of Salvation. Take them out, and one of them will drop the Scanner augment, which you might recognise from the Deep Stone Crypt raid.
Pick up the Scanner and use it to hack all of the yellow highlighted terminals in the room. Once that is done, the drop pods will come down. Get in one of them to be transported to Seraph Station.
- If you're looking for a powerful weapon to take with you, look no further than Destiny 2 Merciless.
Destiny 2 Operation Seraph's Shield: Traversing The Station
Once you enter the station, you will be in a room with a locked door. To the right of the door is a terminal in which you can deposit the Scanner augment. Doing so will unlock the door, which is something you will need to do often throughout the station. Once the door is open, you will notice a kind of forcefield, any door that has this will remove any augment you are currently carrying.
Enter the next room and take out the enemies. Grab the Scanner, then hack the nearby terminal. You will see another yellow terminal through the glass, so take the vent on the left to enter that room. Then return to the first room to exit through the next door. Hack the terminal in the hallway, then in the next room, the Engineering Sector, deposit your Scanner to open the door across from you as you walk in.
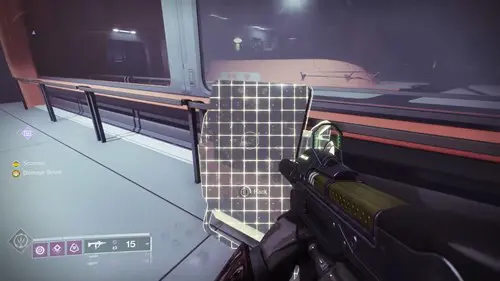
The next room is more of the same, clear out enemies, and hack terminals to open doors. Here, you need to hack the terminal behind the pillar on the left, this will cause a bunch of Shanks to appear on the right side of the room. Jump up to the ledge there and go through the vent. This will bring you to a room with some lasers, simply wait for them to turn off one by one to make your way past them. Hack the terminal at the back of the room, turning off the lasers and opening the door.
Defeat the enemies that enter the room, and look at the window opposite the laser room. Inside you will see four terminals, one of which will be glowing yellow. These correspond to the terminals in the next room, which you cannot enter with a Scanner. So deposit your Scanner augment to open the door, enter the room and go upstairs, then hack the corresponding terminal to the one you saw glowing downstairs. This will open the door at the end of the main room, and you can progress.
- the next expansion is just around the corner, learn all about it in our Destiny 2 Lightfall release date guide.
Destiny 2 Operation Seraph's Shield: Good Times With Turrets And Traps
In the next room, you will encounter many turrets. Turrets are all over Seraph Station, and they are tough to destroy. You are best to go slowly, and take the turrets out one at a time, from a distance. A heavy weapon is advisable when dealing with turrets, as they take a lot of damage to destroy. Clear out the turrets in this room, then make your way up to the door.
The next room has many enemies, and some turrets. Your first priority is clearing them out, then we can deal with what comes next. One of the enemies in the room was standing by a window, and had a Scanner augment. Pick up the Scanner, and you will see some terminals light up on the other side of the window. There are three sets of three terminals, and one in each set will be lit. You need to memorise which terminal is lit up, going from left to right.
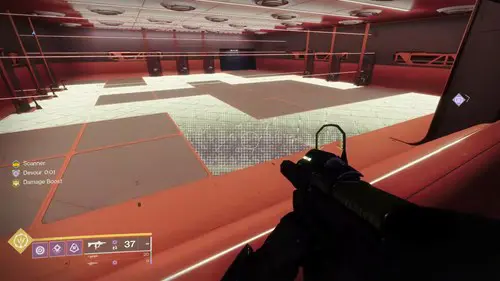
Then, head down to the ground floor and look through the window below the last one. You will see more terminals laid out in the same pattern, but none of them glow. Much like the previous terminal room, you need to remember which ones to activate. However, we have the added danger of a trapped floor.
The floor in this room is laid out in a grid of squares. Looking at it with the Scanner, some of the squares will be lit up. These squares are the only ones that are safe to stand on, any others will instantly kill you. What's more, you cannot enter the room and just leap halfway across it, you need to follow the path or the room will wipe you. So on top of remembering which three terminals to hack, you need to memorise the floor pattern. To make matters worse, there are lasers in the room that you need to jump over and duck under.
The terminals change each time, but the floor pattern seems to be consistent. The safe route is to enter the room, go four squares west, two north, three west, duck under the laser, hack the first terminal, go two squares east from the middle terminal, jump over the laser, two squares north to the second group of terminals, hack the second terminal, two squares south from the right terminal there, jump over the laser, three squares east, then hack your last terminal and you are safe.
- The sleeper hit of the season is looking to be the Destiny 2 Prolonged Engagement SMG.
Destiny 2 Operation Seraph's Shield: Red And Yellow
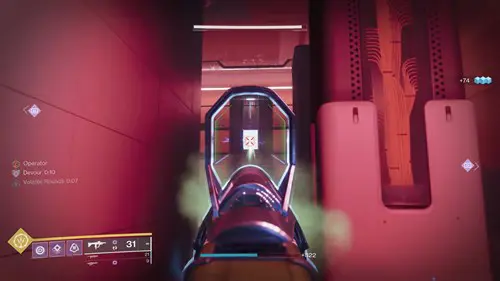
In the room after the trap room, you will encounter the red Operator augment for the first time. Again, just like Deep Stone Crypt, Operator allows you to shoot glowing red panels that usually open doors. As such the next few rooms revolve mostly around using the Operator and Scanner augments to shoot red panels or hack yellow terminals.
In the next room, use Operator to shoot the red panel in the room on the left, which opens the door at the end of the room. Defeat the Knights and the Shriekers to enter that room, then follow the vent at the end. This will let you see into another room, where you can shoot another panel. Once shot, return to the first room, and find the vent entrance to the right of where you first came in.
Go through the vent into the windowed room, defeat the enemies and shoot the red panel. Now go back into the main rooms and through the door on the left. Inside, defeat more Hive and deal with the many slow mines until you enter a lab. Inside will be more House Salvation, and more turrets. Defeat them all and grab the key that the Captain drops. At this point, Elsie will tell you her brilliant plan. Get captured.
- For tips on an even bigger challenge, check out our Destiny 2 Spire of the Watcher dungeon walkthrough.
Destiny 2 Operation Seraph's Shield: Prison Break
Enter the next room, which is a giant, wide room. You can drop a rally banner here, which is advisable if you are anyway lacking in heavy ammo waiting for abilities to cooldown. Shoot the explosive barrels in the middle of the room to start the encounter. First, a giant Knight will appear in the middle of the room, followed by some ads. Clear out the ads and start damaging the boss.
Once the Knight has lost about a third of it's health, it will shield itself and three Brigs will appear. You need to take out all three Brigs, while also dealing with a massive influx of regular enemies. Clear the room, and make your way forward. In the next room, a group of Salvation Eliksni will teleport in behind some glass. This is where we need to stage our "capture". Surrender your weapons, and you will be transported to a cell on their ship.
Once there, you simply need to hold the button on screen to reacquire your weapons and bust out of prison. Fight your way down the cell block toward the exit. You can hit a button on the right side as you enter the main corridor to free all the Braytech frames, who will help you fight your captors. Continue straight ahead, clear the last room of turrets, and then jump back to the station.
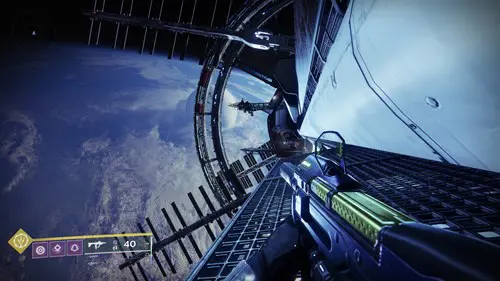
What comes next is another familiar sight for DSC fans, a spacewalk. You need to platform your way to an open cargo bay and re-enter the station. From the ship, jump down to the arms below, then jump across them to get to the side of the station. Make your way forward along the side, jumping across platforms and dodging the rotating parts.
There will be enemies along the way, which you will want to deal with as the lack of cover means they can shoot you from almost anywhere. The one enemy you really want to deal with is the Splicer with the Operator augment. Take him out and grab the Operator buff. From where you pick it up, you will notice you cannot jump to the next section. There are several circular holes in the wall between you and the next platform, and you need to shoot three Operator panels to bring out the platforms you need to cross.
Stand on the large platform next to the holes, then look back to the platform where the Operator Splicer was. The first panel is underneath it to the left. The second panel is on the circular section at the end of the same platform. The third panel is on the opposite side, where you are trying to get to. You should see it plainly once it lights up red. With the three platforms ready, make your way across to the next section, then up and into the cargo bay.
- learn more about the new exotic bow in our Destiny 2 Hierarchy of Needs explainer.
Destiny 2 Operation Seraph's Shield: Clearing The Station
![]()
Now we are on the home stretch. As you enter the docking bay, there will be some enemies, and two Ogres. Deal with them, then deposit your Operator augment to open the door at the back. In the next room, the Hive Knight boss from earlier will appear, so make quick work of him before moving on to the next room.
The next couple of rooms are quite simple; there will be enemies, some will have Operator, some will have Scanner. Defeat them all, take their augments, and use them. If a room has an Operator in it, you can be guaranteed there is a red panel to shoot. If the next room has a Scanner, then something needs to be scanned. Just keep your eyes open and you will have no issues getting through the next few rooms.
Once these rooms are clear, you can take the teleporter to the Operations Sector. Deposit your augment to open the next door, and enter the room where we encounter the third and final augment, Suppressor. Just like DSC, the Suppressor's job is the stand underneath the round drones and shoot the shielded boss enemy.
In this room there will be a Servitor with an unbreakable shield, you simply need to grab the Suppressor augment, stand under all three drones, and shoot the Servitor. Once that is done, the door on the left will open, and inside you will find the shield drone. Shoot it to destroy it, taking down the Servitor's shield and allowing you to destroy it.
- Once you are done here, you can get your hands on the Destiny 2 Revision Zero exotic pulse rifle.
Destiny 2 Operation Seraph's Shield: Praksis The Defiled
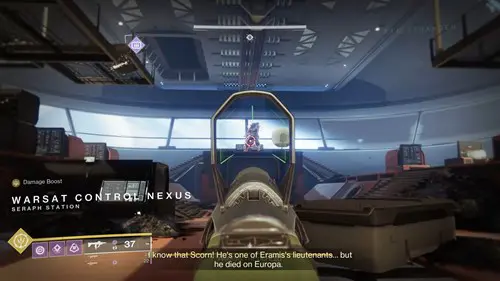
Finally, we have reached the Warsat Control Nexus, and the final boss of the mission. This room is the same room in which we fight Taniks on the Deep Stone Crypt, before it crashes. Thankfully, we do not need to ride this space station to the surface, but we do need to defeat a powerful boss.
Praksis The Defiled is one of the Scorn, which is what you will be facing throughout this fight. The encounter works like a simplified version of fighting Taniks here. The boss's health bar has three segments. Do damage to empty the first segment, at which point Praksis will gain an invincible shield.
Once this happens, an enemy with the Suppressor augment will spawn in on the upper walkways. Defeat them and take the Suppressor. Then, shoot Praksis while standing underneath each of the drones. This will open the doors on the far left, middle, and far right of the room. In each will be a shield drone, destroy it and his shield goes with it.
The fight is simple enough, you just need to repeat those steps until Praksis is dead again. Your biggest problem will likely be the sheer amount of extra enemies in the room, so have someone dedicated to keeping them cleared out, or if you are playing solo, be sure you are equipped for ad clear.
Once Praksis is dealt with, go into the room on the left and interact with the console to complete the mission.
That is it for Destiny 2 Operation Seraph's Shield. For more Destiny 2 tips, check out our Destiny 2 Seraph Key Codes guide.

About The Author
Dave McAdam
Dave is a Senior Guides Writer at GGRecon, after several years of freelancing across the industry. He covers a wide range of games, with particular focus on shooters like Destiny 2, RPGs like Baldur's Gate 3 and Cyberpunk 2077, and fighting games like Street Fighter 6 and Tekken 8.
This is part of the ‘Destiny’ directory
Directory contents
-
Seasonal Artifact Mods
-
All Exotic Weapons & Armour
-
Best Prismatic builds
-
Campaign Mission List
-
Convalescence: Budding
-
Ending Explained
-
Episode Echoes Act 1
-
Episode Heresy Explained
-
Episode Revenant Explained
-
Ergo Sum Exotic
-
Every Prismatic Aspect, Fragment & Ability
-
Red Death Reformed
-
Wild Card Mission
-
All DLC & Expansions
-
Solstice 2024


