

Escape Academy The Rival Room Walkthrough
Check out our Escape Academy The Rival Room walkthrough.
Our Escape Academy The Rival Room walkthrough will give you a breakdown of the hardest room you'll encounter so far, which challenges you to go one-on-one with the other best escapist student at the academy for a chance at a trophy. All the skills you have learnt so far in Escape Academy will be vital for mastering this room and its many puzzles. So check out how to beat the Escape Academy The Rival Room.
Escape Academy The Rival Room Walkthrough: Ballista
The Rival Room is split into five major sections, with the Ballista being the first.
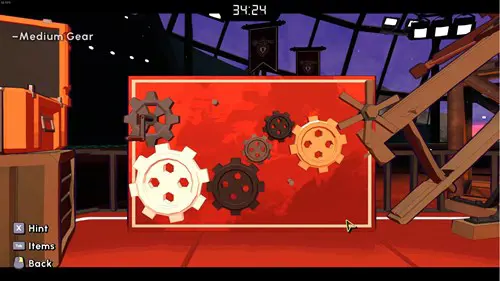
- As you are given control, there will be four boxes around you and a wooden board with some cogs that connect to the ballista. Search the boxes and take the Small Gear from the cabinet, the Large Gear from the orange crate on top of the brown boxes, and the Medium Gear from the black crate.
- Go to the board with all the gears, and place the Large Gear on the left, the Small Gear in the middle, and Medium Gear on the right.
- After these have been placed, you can interact with the handle on the left to fire the ballista and lower the bridge, letting you carry on.
Escape Academy The Rival Room Walkthrough: Statue Room
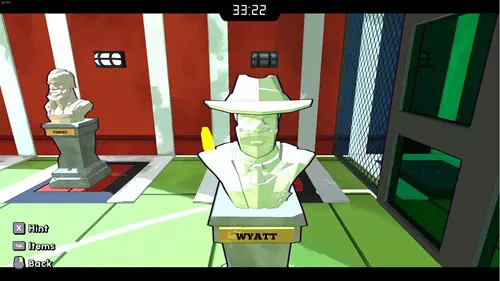
- Next, you will come into the statue room, named so because of all the statues. On the back wall it says "which three can you both see?" And in the middle, there are some names along some glass that can be viewed from both sides.
- The trick is to find the names of the statues that can be seen from yours and your rival's POV. Find the statues with the names Timmy, Max, and Wyatt, and then move them toward the pressure plates on the back wall. Once all plates have been activated, the door to the next section will open.
- Struggling on other Escape Academy levels? Give our Escape Academy Lab Rat walkthrough a read.
Escape Academy The Rival Room Walkthrough: Weight Room
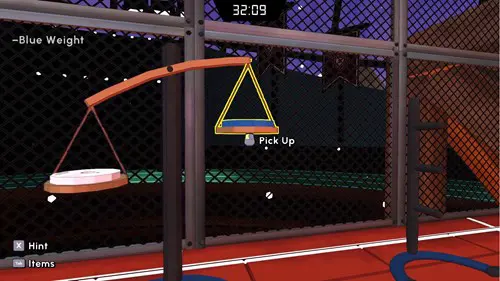
- In the weight room, you will need to find out the individual weight of five circular weights, and then place them on three bars to reach certain weights.
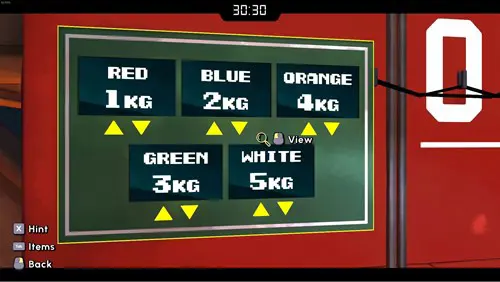
- Start by picking up the White Weight, Green Weight, Red Weight, Blue Weight, and Orange Weight. Use the scale to figure out how much each one weighs, and input these into the digital counters on the wall. You can see a picture of how this should look above.
- Once the digital counters have been set, TVs at the end of each bar will light up and show a number. You will now need to place the weights on these bars to meet each number.
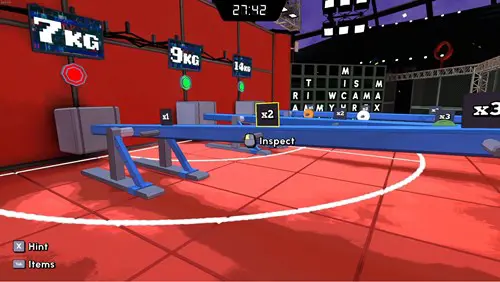
- On the bar that needs 7 kg, put the White Weight on the x1 slot, and the Red Weight on the x2 slot.
- On the bar that needs 9 kg, put the Green Weight on the x3 slot.
- On that bar that needs 14 kg, put the Orange Weight on the x2 slot, and the Blue Weight on the x3 slot.
- With all the weights on the correct slots, you can enter into the next room.
Escape Academy The Rival Room Walkthrough: Colours And Shapes
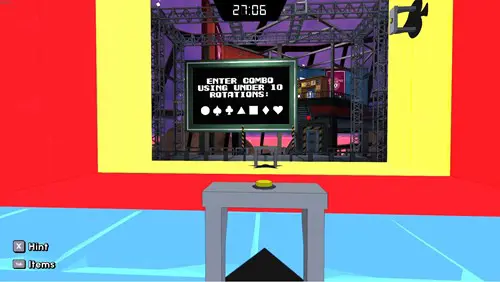
- In this next room, you will see six directional buttons, and then a massive machine with various colours and pictures. The machine is made up of three rings, coloured blue, yellow, and red, with each ring having different shapes on each side. The coloured directional buttons in front of the machine also rotate different rings.
- At the end of the machine, there is a big screen that reads "enter combo using under 10 rotations," along with some shapes which are: circle, spade, club, triangle, square, diamond, and heart. You will have to rotate the rings on the machine so you can press the button for each of these shapes in order.
- Here is the order: press the left purple button twice and press the circle button.
- Press the right orange button once, and then press the spade button.
- Press the left orange button twice, and then press the club button.
- Press the left purple button once, and then press triangle button.
- Press the left purple button once, and then press the square button.
- Press the left purple button once, and then press the diamond and heart buttons.
- You will now be able to access the final room.
- Loving Escape Academy but stuck on a certain level? Give our Escape Academy The Tea Kettle walkthrough a read.
Escape Academy The Rival Room Walkthrough: Double-Sided Safe
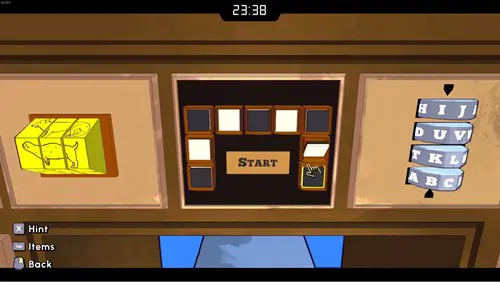
- In the final room, you will find the double-sided safe, which is split into a series of squares that come with quick-fire puzzles that you need to solve in a specific order.
- Begin in the middle tile at the top, which is labelled "start." If you flip the squares, you will notice some have brown backs, and some have black backs. If you flip them so all the black backs are shown, and the brown ones have their white sides facing, it will open to reveal the Cabinet Key.
- Use the Cabinet Key on the panel with a keyhole on the right side. Inside it will say "ring the bells my dear" but the letters G, E, A, E, D are underlined. Interact with the bells on the left side of the cabinet in the order listed above, and it will open. Inside there will be a Bronze Medal and a message that says "you'll escape when pigs fly."
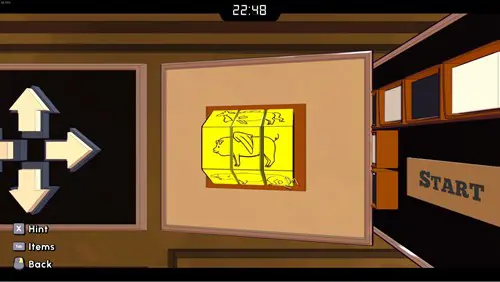
- For this, use the panel with the golden rotating rings. You will need to create a pig with wings, which we've shown above. Inside of here there will be a series of arrows.
- The arrows point up, right, up, left, and down. To the direct left of this panel, there is another with four arrows. Input the directional code you just received, and it will open to reveal 1 Cent Coins, 5 Cent Coins, and 10 Cent Coins.
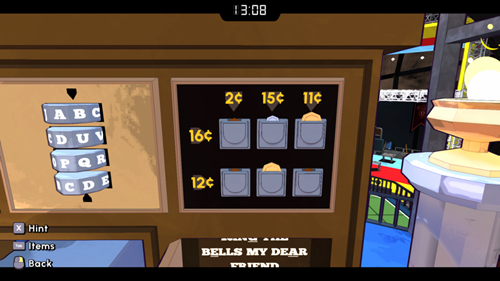
- Now head to the panel at the top right. There will be six slots for coins, formed in two rows and three columns, with different cent values on the left and above. You will need to input the coins so that the rows add up to the numbers on the left, and so the columns add up to the numbers above. On the first row, put the 1 Cent Coins in the first slot, the 5 Cent Coins in the second slot, and the 10 Cent Coins in the third slot. Then for the second row, put the 1 Cent Coins in the first slot, the 10 Cent Coins in the second slot, and the 1 Cent Coins in the third slot. Inside here are Playing Cards.

- You will need the Playing Cards for the bottom-left panel. Interact with it, and you will notice the clock numbers go Ace to King, and the clock hands are all card suites. You will need to match the hands and their suites to the values on the four Playing Cards. Once this panel opens, you can get a Silver Medal.
- The back wall of the panel also has the word "bane." Go to the panel at the top with the combination lock that has letters, then spell out above word. Inside here, you will find Marbles for the final panel.
- Interact with the last panel in the bottom right. You will need to use the Marbles and funnel them into the correct coloured pits, but there is a specific order to make them fall in the right location. You can figure this out from trial and error, but the order is yellow, yellow, orange, yellow, orange, and orange. When the panel opens, you can grab the Gold Medal.
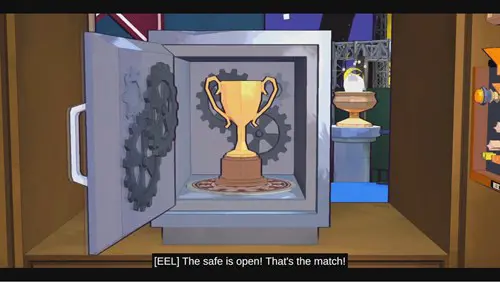
- You will now have all the medals for opening the safe in the middle. Place each one in the corresponding location, and the safe will open for you to grab the trophy and finish The Rival Room.
That's all for our Escape Academy The Rival Room walkthrough, and now you know how to conquer each puzzle and win the race.

About The Author
Tarran Stockton
Tarran is a Senior Guides Writer at GGRecon. He previously wrote reviews for his college newspaper before studying Media and Communication at university. His favourite genres include role-playing games, strategy games, and boomer shooters - along with anything indie. You can also find him in the pit at local hardcore shows.


