

Escape Academy Escape Artist Walkthrough
Here's our Escape Academy Escape Artist walkthrough so you can finish the level as quickly as possible.
Our Escape Academy Escape Artist walkthrough will help you solve Slip's elaborate escape puzzle, which involves a multitude of different puzzles and connecting pieces that all contain an artistic twist. After gaining entrance to Escape Academy, you will have the option to choose from two different escape rooms, with the Escape Artist being ranked the easier one. You're given 30 minutes to solve this room, and you'll need most of that time because this is the longest escape yet. So read on for our Escape Academy Escape Artist walkthrough, which gives you the step-by-step solutions to each puzzle.
Make sure to check out our walkthroughs for the other escape rooms:
Escape Academy Escape Artist Walkthrough: Getting The Anti-Invisible Ink
The best way of starting the Escape Artist level is by tracking down the Anti-Invisible Ink, which is a key item for getting to the next major section.
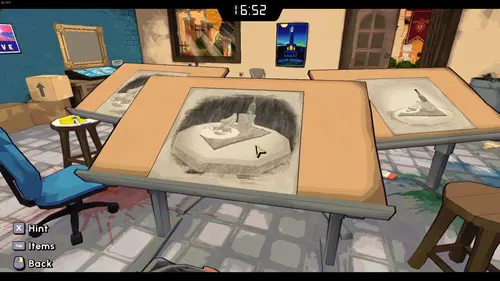
- Once you are given control, on your left there will be a building with an open door that you can go inside. You should find a series of sketches on some desks, and a table, but the items in the sketches are missing from the table.
- The first item is some Paint-Stained Wine, which can be found on a blue chair in front of one of the desks. The next is a piece of Paint-Stained Cheese which is on a stool in front of another desk. Finally, the Paint-Stained Bananas can be found inside of the middle cabinet against the wall.
- With all the items in hand, return to the table near the desks, and place the items on to recreate the scene. If you then walk behind it, the paint will line up and reveal the numbers 139.
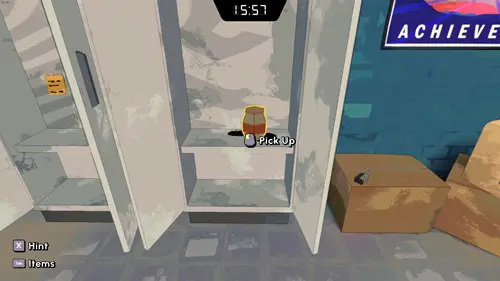
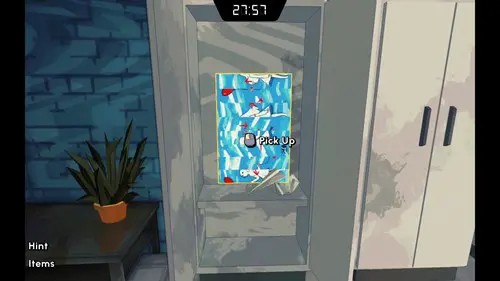
- Go back to the cabinets, and interact with the one on the right, allowing you to enter the code "1-3-9." You can now open the cabinet doors and grab the jar of Anti-Invisible Ink inside.
Escape Academy Escape Artist Walkthrough: Getting The Spray Paint
Now that you have the Anti-Invisible Ink, you can start the process to get the Spray Paint, which is a key item for finishing the escape room.
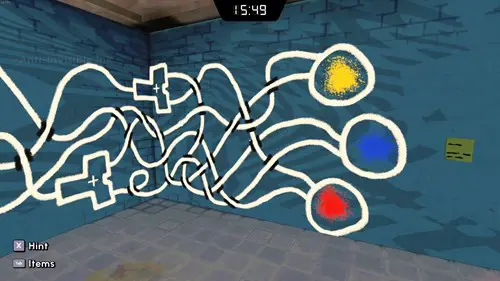
- With your Anti-Invisible Ink, in this same room, make your way to the giant splotches of yellow, blue, and red paint on the wall. Interact with and use item to reveal a series of lines of paint.
- From left to right, you should notice the lines form paths from the switches next to the door that connect to one of the splotches of paint. Some paths also branch off and connect to two splotches of paint. You need to figure out which of the colours correspond to the switches by following the paths. For the branching paths, you will need to combine the colours they lead to figure out what the colour on the switch should be.
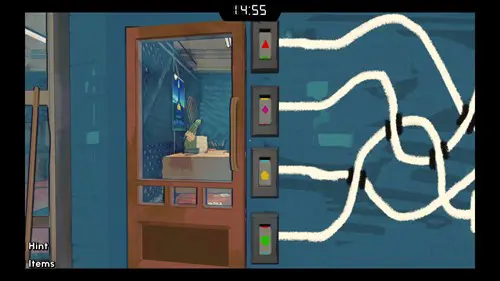
- From top to bottom, the switches should be red, purple, yellow, and green. Once the switches are in this order, you can enter the door. In one of the cages inside, you can find the Spray Paint.
Escape Academy Escape Artist Walkthrough: Opening The Safe
This is where the rest of this level starts to ramp up, but your goal for now should be to enter the last door in this building and open the safe.
- Begin by opening the final cabinet, which should be the one on the left. Inside you can find the "Open Sesame" Painting which looks out of order.
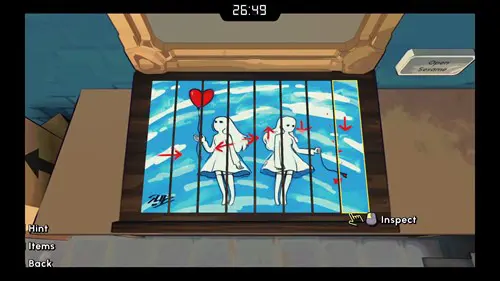
- With this painting, make your way to the right of the cabinets where you can find an empty frame, a desk, and a plaque that reads "open sesame." Interact with these, and you will be able to select the frame and put the "Open Sesame" Painting inside. This causes the picture to be shredded and fall down to the desk, allowing you to rearrange it in the correct order. Make it look like the picture above.
- Once this is done, the painting will reveal a series of arrows that face right, left, right, up, down, and down. Turn around and head to the glass doors with the arrow buttons in it. Input the directions above and the doors will open up.
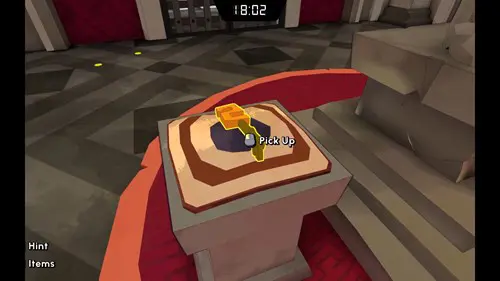
- Inside of this room there is a safe with nine blank buttons, and four blank canvases against a metal fence. You can interact with the screen in front of these and move it around to see the actual paintings. In left to right order, they show a fountain, a cube statue, a keyhole statue, and the symbols for the buttons on the safe. The symbols you will need to open the safe can be found on the three highlighted monuments which are outside.
- Exit the building and follow the wall to the right to get to the fountain, which will have a square with two corners missing. Go back to the doorway, and look to your left to find the cube statue, which has a hollow circle. Finally, the keyhole statue can be found in the centre of the courtyard, which has three small circles.
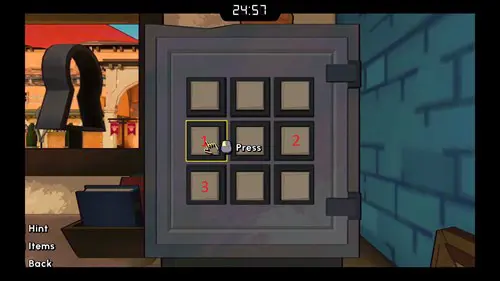
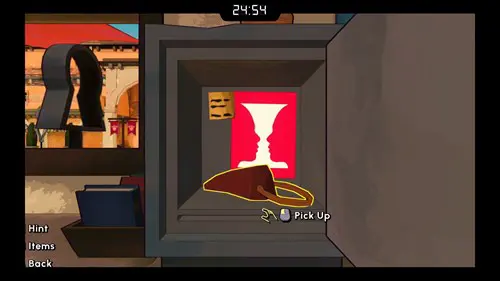
- Go back to the previous room and find the corresponding symbols on the fourth picture frame. You will then need to input these on the safe in the same order you found them. We've highlighted which buttons to press in the picture above. Inside the safe you will find the Strange Sculpture, and a poster of a vase which silhouettes two human faces.
Escape Academy Escape Artist Walkthrough: Face Door Puzzle
With the Strange Sculpture, you can start the Face Door Puzzle in the courtyard to gain entry to the next major section of this escape room.
- Head outside, and directly across from where you exit the building, there is a large face on a door. Interact with it, and you can place the Strange Sculpture on it, revealing it to be the nose.
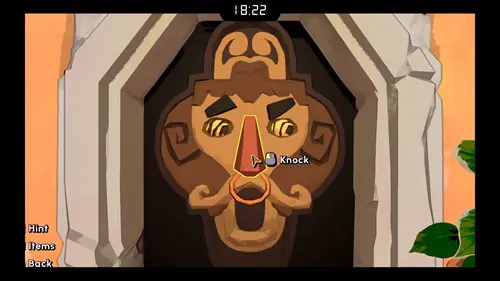
- On each side of the door, there are four faces on top of some vases. Each face is altered slightly, with different variations of eyebrows, eyes, and mouths. You need to find the faces, and interact with the corresponding parts on the door so you can open it. The key for this is to interact with each vase, and find the ones which look like the picture from the safe with the two silhouettes of the faces. We have a picture of the correct face that the door needs above.
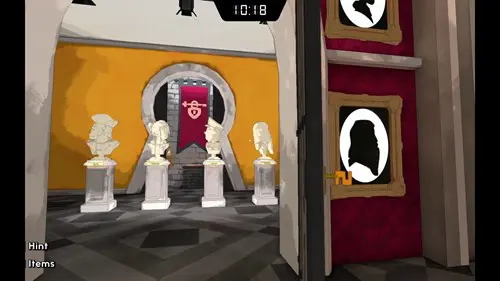
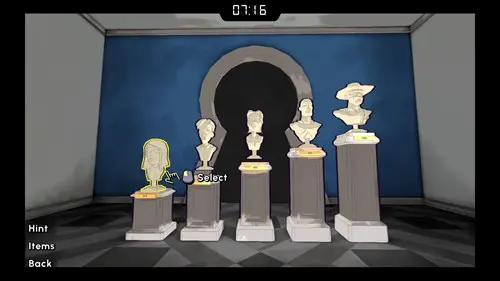
Escape Academy Escape Artist Walkthrough: Statue Rooms
Once you enter the room with the giant statue in the middle and three large doors, you will be in the final stretch of this level.
- On either side of the large statue are pedestals which have Key #2 and Key #5.
- Each of the huge doors in this room will have a number spray-painted next to them. The key to opening these doors is to get the keys with the numbers that add up to the total next to the doors. These first two keys can be used on the door with the number seven next to it to open it up.
- Inside there are four statues which need to have their heads facing the correct way. The hints for which ways all the heads should face can be found around the door frame, where there are paintings. The first statue should face left, the second to the right, the third to the left, and the final statue should face right. We've also shown the order above. Once the statues have been put in the correct position, a door behind them will open where you can grab Key #3, Key #4, and Key #7.
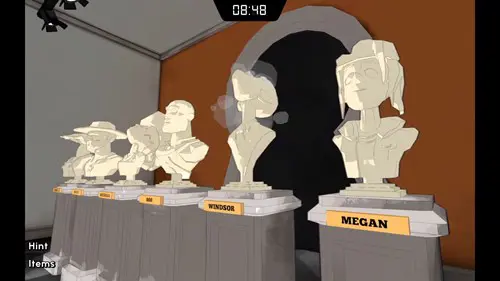
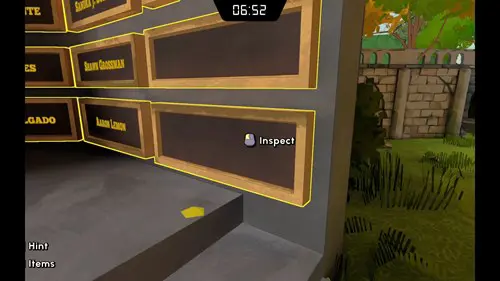
- You can now use Key #3 and Key #7 to open the door with the number ten next to it. Inside here there will be six statues which can be broken when interacted with, but pushing their heads backwards. You need to break the correct statues, which are also hinted to by the paintings around the door frame. The statues you need to break are the ones labelled Timmy, Michelle, and Windsor. You can see this above. The door behind them will open, where you can grab Key #1.
- Use your final keys on the last door to once again find some statues, but this time they are arranged on different sized pedestals. You will need to arrange them in the correct height order, which is once again alluded to by paintings around the doorframe. The picture above shows the correct height order. Once they are all in place, the door behind them will open up, leading you outside.
Escape Academy Escape Artist Walkthrough: Tagging The Monument
Once you arrive outside again, you can follow a short path and arrive at a monument with a tonne of names of the Escape Academy alumni. Interact with and use the Spray Paint to tag your signature and finish the level.
That's our Escape Academy Escape Artist walkthrough, and now you know every step you need to take to finish the level.

About The Author
Tarran Stockton
Tarran is a Senior Guides Writer at GGRecon. He previously wrote reviews for his college newspaper before studying Media and Communication at university. His favourite genres include role-playing games, strategy games, and boomer shooters - along with anything indie. You can also find him in the pit at local hardcore shows.


