

How to complete the Crack the Code mission in DMZ
This step-by-step guide contains everything you need to finish the Crack the Code mission in DMZ.
DMZ features all sorts of missions, but there aren't many as challenging and complex as Crack the Code. Completing this DMZ mission blind is near impossible, so it's useful to have a guide on hand to follow. With that, let's go step by step over how to finish the Crack the Code mission in DMZ.
Preparation for the Crack the Code mission
Crack the Code is a Tier-5 Story Mission for the Black Mous Faction. This mission is extremely demanding and time-consuming. To complete it, you must solve intricate puzzles, fight off dozens upon dozens of AI soldiers — including bosses — and secure a few key items inside the Koschei Complex.

- For starters, bring as much ammunition and Armour Plates as possible. You will need to do a lot of killing and withstand tons of damage, and running out of supplies could end your attempt prematurely
- Some additional items you will need in your backpack before entering the Koschei Complex include a Car Battery and a couple of Jumper Cables. Together, a Car Battery and Jumper Cables will allow you to open the doors necessary to complete the mission's objectives
- It's also helpful to bring in a pair of Night Vision Goggles. You can grab these inside the Koschei Complex, but if you want to save time, you can use the Barter System at a DMZ Buy Station and craft the Night Vision Goggles with the appropriate DMZ Barter Recipe
How to get the diamond-tipped drill
- To get started, deploy to Al Mazrah and immediately make your way to the Koschei Complex via one of the four entranceways. Once inside, head toward the Chemical Plant
- In the Chemical Plant, there are a few items you will want to grab before continuing onward. Search for and collect some Night Vision Goggles, the R4D Detector, and the Factory Admin Key
- Once you're ready, hug the outer walls of the Chemical Plant until you come across an electrical junction box where you can insert a Car Battery and Jumper Cables. After that, you will be able to open the Bunker Door to the Alpha Cluster! Venture forward into the Alpha Cluster until you get to an open area
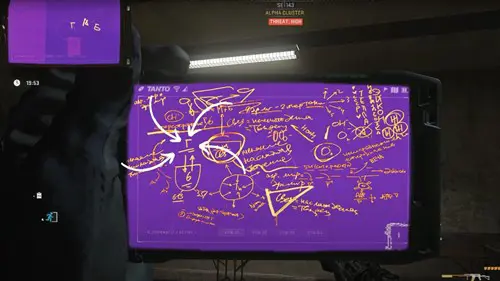
- Up the stairs in this area, you will find some Cartel Members and a couple of Sentry Guns posted up outside a yellow-coloured door to the keypad-locked room. Eliminate the threats and analyse the keypad with the R4D Detector. You must memorise the hidden symbols revealed by the R4D Detector, so consider jotting them down or taking a picture with your phone
- Now, travel around the surrounding area and look for blackboards. There are seven blackboards in total, each etched with writing that you can only see with the R4D Detector. Examine the blackboards for symbols that match the three symbols above the keypad
- When you find a matching symbol on a blackboard, note the number tied to that symbol. The three-digit code to the keypad corresponds with the three secret symbols carved above the keypad
- As soon as you think you've deciphered the code, return to the yellow door and enter the three numbers to unlock the keypad-locked room and acquire the Diamond Bit Drill
How to drill the safe in the Factory Wing and extract the note found inside
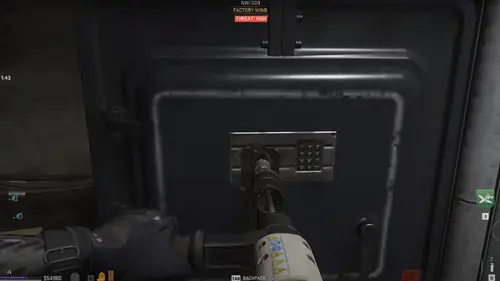
- With the diamond-tipped drill in your backpack, exit the Alpha Cluster back to the Chemical Plant. If you grabbed the Factory Admin Key earlier, you can use it now to unlock the door into the Factory Wing, which is where you will find the safe that contains the Bunker Safe Note
- Inside the Factory Wing, you will encounter The Rhinoceros and The Sniper. Before you can proceed in the Crack the Code Story Mission, you must defeat these two DMZ bosses
- Defeating The Rhinoceros will automatically open a door on the northern end of the room, revealing a stairwell. Take the stairs up to pursue The Sniper. Chase The Sniper through the winding hallway until you best him
- If you continue through the upstairs corridor, you will eventually find a room containing the Factory Safe. Use the Diamond Bit Drill on the safe to start drilling it. Grab Dr. M's Lab Notebook from the safe, and you're ready to extract
- Escape the Koschei Complex before the radiation closes in to complete the Tier-5 Crack the Code Story Mission in DMZ. If you feel like you're cutting it close and running out of time, you can use a Secure Backpack to safely exfil the Diamond Bit Drill and come back in another deployment to drill the safe and finish the second objective
Crack the Code rewards
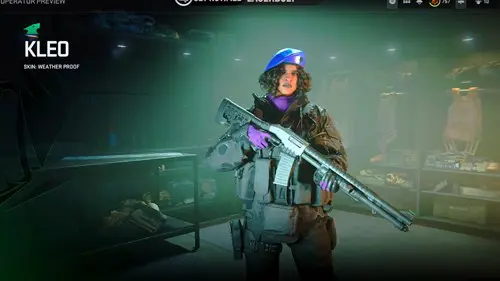
For all your efforts, you will receive the exclusive Weather Proof Operator Skin. This Operator Skin serves as proof of your trials and tribulations in the DMZ. As a bonus, you will also get a whopping 40,000 XP.
The Crack the Code mission is undoubtedly one of the most difficult missions in the game, especially if you're attempting it solo. If you go in blind, there's a decent chance you come up short before the radiation consumes you.
But if you meticulously follow the steps outlined in this primer, you have a great shot at completing the required DMZ objectives and satisfying the Black Mous Faction.

About The Author
Coleman Hamstead
Coleman is a freelance journalist at GGRecon. While gaming has always been his passion, it wasn’t until he worked as a Sports Journalist at the Community College of Baltimore County that he found his enthusiasm for writing. In the time since Coleman has had his work featured in publications such as The Washington Post/Launcher and ESTNN. Coleman is a graduate of Towson University with a degree in Sport Management and Business Administration.


