

How to get all parts of Misko's Treasure in Zelda: Tears of the Kingdom
Heard about Misko’s Treasures in The Legend of Zelda: Tears of the Kingdom? Well, we’ve got you covered on where you can find them all and what they do as well.
You'll want to know the map locations and rewards for the Misko's Treasure in Zelda: Tears of the Kingdom, as it allows you to get some powerful armour pieces in the early game, which comes with useful effects.
In The Legend of Zelda: Tears of the Kingdom, fashion isn’t just for looking good, as it also has a function thanks to the various pieces of armour across the game. While you'll slowly come across better equipment as you progress into the game, it's worth spending the early hours finding Misko's Treasure for its buffs.
So, check out the how to find the Zelda: Tears of the Kingdom Misko's Treasure, which covers the map locations and rewards themselves.
- Check out where to find the Archaic Tunic in The Legend of Zelda: Tears of the Kingdom too!
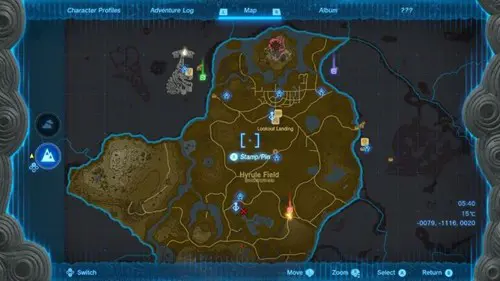
While meandering around the Hyrule Field in The Legend of Zelda: Tears of the Kingdom, you may happen upon a woman in a fashionable blue dress called Meeshy. Finding her can be down to luck, but she often appears on roads, near stables and settlements.
While she would love to chat with you about the latest trends in Hyrule fashion, she instead tells you about three unique articles of clothing called Misko’s Treasures.
These clothes have unique properties that will be extremely helpful on your journey. During the conversation, she will mark three locations on your map. How kind.
While they will appear as X’s, we’ve used red, green and blue pins on our map above. You can tackle these in any order.
- If you want some armour while in Gerudo Town, check out how to join the Zelda: Tears of the Kingdom Gerudo Town secret club.
The North Hyrule Plain Cave located at the coordinates -1188, 0646, 0072, is the upper-left location shortly after crossing the Carok Bridge (and defeating the Hinox that is sleeping there).
As you make your way through the cave, you will come to a waterfall with several glowing mushrooms behind it. Swim behind the waterfall and you will find the treasure waiting for you.
For completing this cave, you will receive the Climbing Gear, which raises your climbing speed and prevents you from slipping down wet or rainy surfaces.
- Looking to buy some more goodies? Check out how to farm Rupees in The Legend of Zelda: Tears of the Kingdom as well!
Crenel Hills Cave (coordinates 0484, 0729, 0041) is the upper-right location runs along the Hylia River and can be found after crossing the Orsedd Bridge. This cave is a large open cavern with breakable rocks all along the wall. On the ceiling, you will find a Bubbul Frog just waiting to drop a gem for you.
However, it isn’t the only enemy lurking in this cave. As you get closer to the centre, a Stone Talus will wake up and begin a boss encounter. Defeat this colossus by striking his shining rock weak spot to advance.
After defeating the Stone Talus, start destroying the breakable rocks near the far edge of the cave with Bomb Flowers or a blunt weapon.
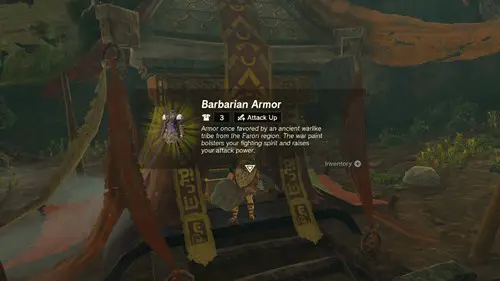
Climb up and into the newly opened treasure room to claim the treasure. For completing this cave, you will receive the Barbarian Armour, which will raise your attack power.
- Wondering where to find all the Shrines in Central Hyrule? We've got you covered as well!
Whistling Hill Cave (coordinates -0065, -1053, 0019) is the lower location, going South from Lookout Landing. You will need Bomb Flowers or a blunt weapon to break through the rocks and enter the cave.
As you traverse the caverns, be sure to pluck the Bomb Flowers you’ll find littered about. You’ll encounter a small group of Skeleton Bokoblins and a Like Like spitting boulders down a ramp.
When you reach the final part of the cavern, an electric Like Like will be hanging from the ceiling, firing shocking projectiles at you. As before, defeat the Like Like and climb up to claim your prize.
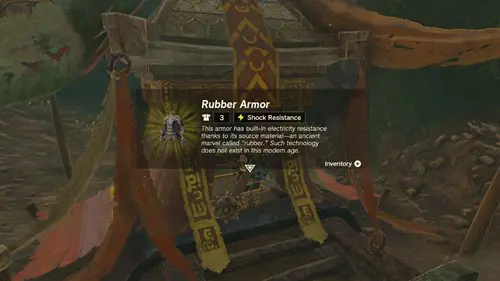
For completing this cave, you will receive the Rubber Armor, which improves your shock resistance from electric attacks and lightning.
That’s everything you need to find all of Misako’s Treasures in The Legend of Zelda: Tears of the Kingdom.
For more on The Legend of Zelda: Tears of the Kingdom, keep checking back with GGRecon!

About The Author
Jack Roberts
Jack is a Guides Writer at GGRecon. With a BA (Hons) & MA in English and Creative Writing, he was also the Gaming Editor for The Indiependent. When not pondering which game has the best cup of coffee (and drinking far too much of it himself), he can often be found playing Dead by Daylight, Street Fighter or making yet another build in Bloodborne.


