

All FF7 Rebirth Lifespring locations in every region, from Grasslands to Nibel
Here are all of the Lifespring & Expedition Intel locations for every region in Final Fantasy 7 Rebirth, letting you unlock all Rare Fiends & Excavation intel.
Finding Expedition Intel Lifespring locations in FF7 Rebirth doesn't just let you find Transmuter Chips and provide info about the earth; they're also key for certain missions - like finding the Quetzalcoatl Talon to repair the windmill in one of the game's side quests.
There are between four and six Expedition Intel sites in every one of the game's regions, and they can be surprisingly tricky to find. You'll need to get your Chocobo ready to ride though, as they'll lead you to things like Rare Fiends, including the infamous Tonberry King.
Grasslands Lifespring locations
| Expedition Intel | Location |
| #1 Cragshade Lifespring | South of Oliver's Farm |
| #2 Wetlands Lifespring | Southeast of Billy's Ranch |
| #3 Morass Lifespring | By the swamp |
| #4 Grasswastes Lifespring | Southeast of Kalm |
| #5 Mako Pipeline Lifespring | South of Kalm |
| #6 Cavern Lifespring | West of the Pipeline |
#1: Cragshade Lifespring
The first of FF7 Rebirth's Lifespring locations in the Grasslands is pretty straightforward to find with it being south of Oliver's farm, so odds are you'll have passed it already and will show on your map.
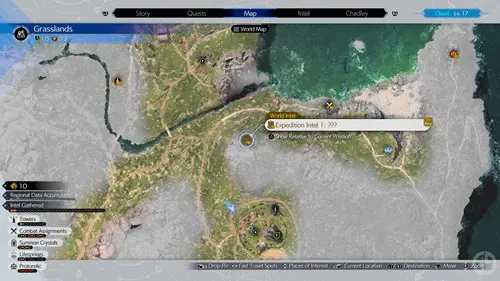
As you approach, the red Springseeker Owl will appear and lead you the rest of the way.
If this is indeed your first Lifespring, Chadley will speak up and encourage you to scan it.
#2: Wetlands Lifespring
Another easy Lifespring to find, you'll just need to head to the marked point southeast of Bill's Ranch in the image below.
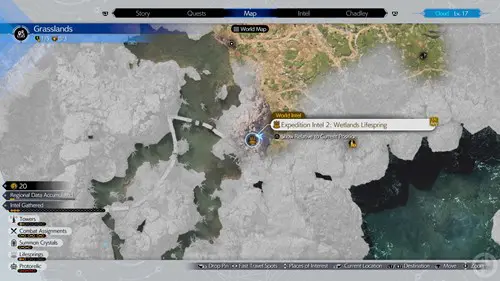
Follow the Springseeker Owl up the cliff and the Lifespring will be right there.
#3: Morass Lifespring
The third Grasslands Lifespring in FF7 Rebirth is the one that personally gave me some real difficulty since I thought I needed to journey across one of the swamp's stone bridges in the image below to get there.
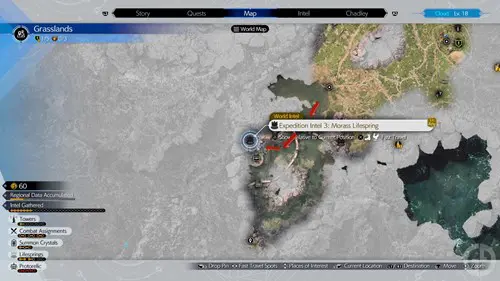
It turns out, you need to go under the bridge using your Chocobos to trek across the swamp until you reach a bit of land - which I've marked with arrows. You'll then see two flights of stairs you need to walk up before you find the Springseeker Owl and it leads you the rest of the way.
#4: Grasswastes Lifespring
This is probably the easiest of FF7 Rebirth's Lifesprings to find in the Grasslands - being a very short trip southeast of Kalm as marked below.
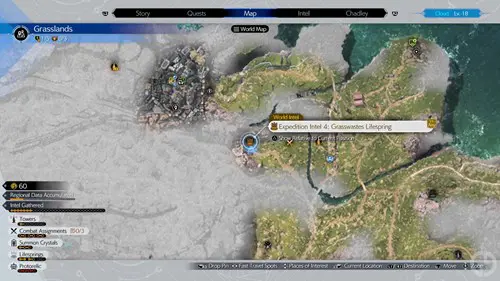
If this is your first time in this particular woodland area, you might get interrupted by Mai with a Combat Assignments tutorial, but you can simply leave the area to skip it and carry on.
#5: Mako Pipeline Lifespring
In the rocky area south of Kalm, this Lifespring can be found to the right of the Field Intel 5 combat assignment.

Head to the right side of the same pipeline, and you'll soon spot the Springseeker Owl up a hill which will lead you to the fifth Grasslands Lifespring by a tree.
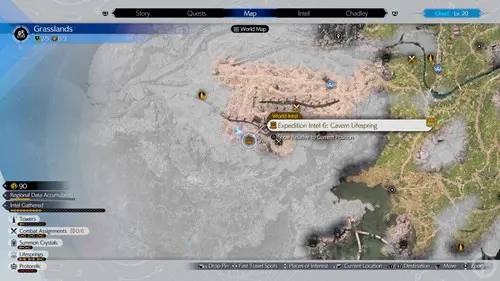
#6: Cavern Lifespring
After getting the fifth, finding the final Grasslands Lifespring location in Final Fantasy 7 Rebirth is simply a quick trip to the left of the same pipeline and heading further south and up a hill before the Springseeker Owl is in your sights and takes you the rest of the way.
After you've scanned the final Lifespring for the region, Chadley will contact you and mention he's analysed the data you've sent to find the location of a new Transmuter Chip.
Now you'll have scanned enough Lifesprings in FF7 Rebirth to find the Quetzalcoatl, repair the windmill, and even gather more Transmuter Chips.
Junon Lifespring locations
| Expedition Intel | Location |
| #1 Chocobluff Lifespring | East of Under Junon |
| #2 Castaway Lifespring | South Junon, by the shipwreck |
| #3 Mountain Outpost Lifespring | North of Crow's Nest |
| #4 Pharecape Lifespring | South of Crow's Nest (by Kyrie) |
#1: Chocobluff Lifespring
The first piece of Expedition Intel that you can find in Junon is to the east of Under Junon, by the guy that fixes Chocobo Gabe's cart.
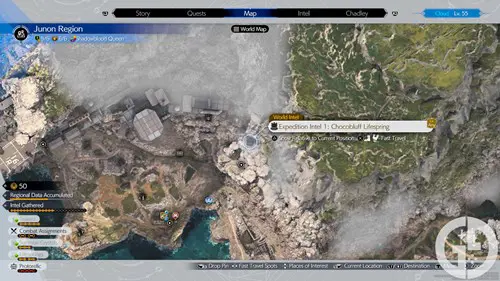
This is the first of many Lifesprings from now on that'll require the region's specific Chocobo mechanic in order to reach. In this case, it's the Junon Chocobo's ability to climb rock faces - so make sure you've found the Chocobo locations for every region before progressing here.
#2: Castaway Lifespring
The Castaway Lifespring is, as you can imagine, around the location of the marooned ship on the south cost of Junon.
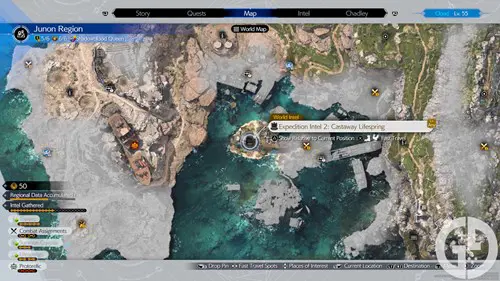
Unlike the previous Expedition Intel, you won't need to do any climbing to get here, but you will need to get your toes a little bit wet by swimming across to the central island.
#3: Mountain Outpost Lifespring
Heading up to the northeast of Junon will help you find this Lifespring, as it can be found to the north of Crow's Nest and to the east of Under Junon.
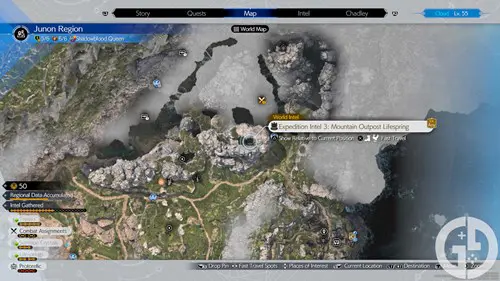
You'll go near this when escorting Salmon the dog to Crow's Nest in one of Junon's side quests, so make sure to pick up a fast travel spot along the way if you're doing that for easy access.
#4: Pharecape Lifespring
The Pharecape Lifespring can only be accessed once you've reached Crow's Nest, as you'll need to take the road south from there to reach it.
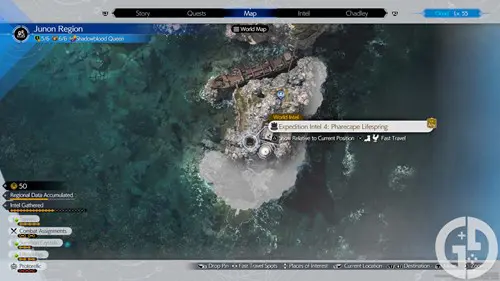
It's also where you'll find our favourite merc Kyrie, as she's set up her very own office - complete with a theme song!
Corel Lifespring locations
| Expedition Intel | Location |
| #1 Secluded Grotto Lifespring | South of Costa del Sol |
| #2 Glencross Lifespring | West of Costa del Sol, by the Gym |
| #3 Oasis Lifespring | Central south Corel |
| #4 Watermain Lifespring | Through tunnels to the south |
| #5 Stonebowl Lifespring | North of the Colosseum |
| #6 Rocketspout Lifespring | Southeast Corel, end of the tail |
#1: Secluded Grotto Lifespring
The first Lifespring that you can find in Corel is just to the south of Costa del Sol, down the road from the Rent-a-Bird stables.
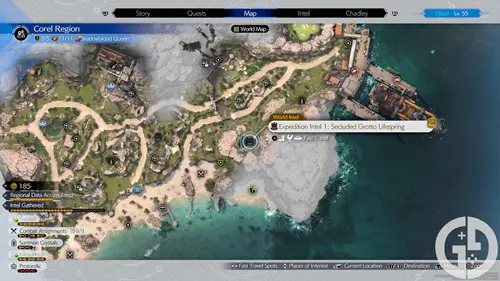
As the name suggests, it's in a bit of a hidden area, but I managed to find it by following the guiding bird that greets you on the main road to the north.
#2: Glencross Lifespring
Just to the west of the first Expedition Intel you'll find the Glencross Lifespring. This is fairly easy to find, and is among many of the different activities you'll undertake in the Corel region.
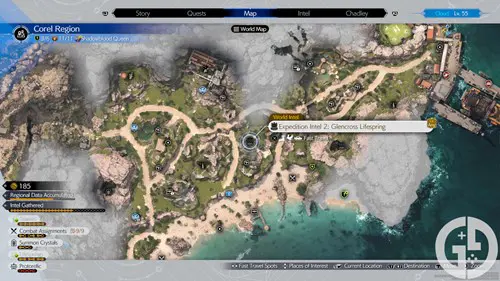
Specifically, you'll want to head south of the old factory where Johnny wants you to find a rare Transmuter chip, and to the east of Jules' Gym where you can do the sit up minigame.
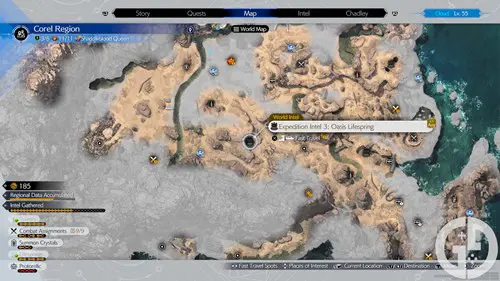
#3: Oasis Lifespring
Heading into the southern part of Corel, you'll find the other four Lifespring locations. This section is only available after you've reached the end of Chapter 8 and cleared Corel Prison, so worry about getting all of the Expedition Intel until you've done this.
#4: Watermain Lifespring
For the Watermain Lifespring you'll need to head through some of the tunnels around this area, as it's in the lower section and you can't just jump down.
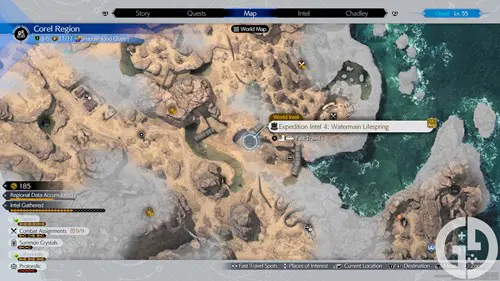
The buggy is great for getting to this one in particular as you have to go through some water and it's much quicker to drive in your giant truck than attempt to swim!
#5: Stonebowl Lifespring
Unlike the previous Expedition Intel, the Stonebowl Lifespring is on one of the higher sections so you'll need to find a way up through one of the routes to the west.
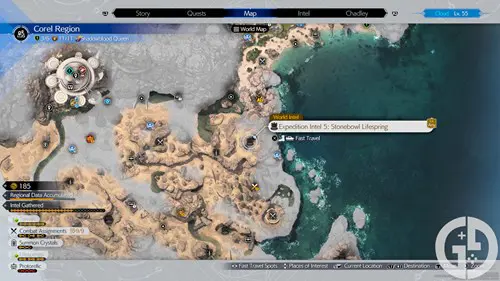
It's probably easiest going from the fast travel point at the top of the water that connects the North Corel/Costa del Sol section to this area. This allows you to drive straight up to the Lifespring and get what you need.
#6: Rocketspout Lifespring
For this final piece of Expedition Intel, you'll need to head all the way to the southeast tail of Corel, which is done through a very specific path through some tunnels.
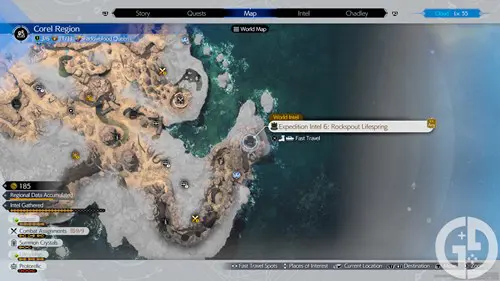
While you can drive the buggy for most of this, there are some parts that are tricky to navigate through and enemies that'll halt your progress, so it might be best to do the last section on foot.
Gongaga Lifespring locations
| Expedition Intel | Location |
| #1 Clearwater Lifespring | By the entrance to the Gongaga region |
| #2 Fallbasin Lifespring | Just outside Gongaga Reactor |
| #3 Valefloor Lifespring | Southeast of Gongaga Airstrip |
| #4 Grotto Lifespring | Near the Protorelic, to the south |
| #5 Holy Ruins Lifespring | West of central Gongaga road |
| #6 Cavern Lake Lifespring | East of central Gongaga road |
#1: Clearwater Lifespring
The first Gongaga Lifespring is not only the most immediate but definitely the easiest to get, as it's just to the southeast of where you enter the dense forest.
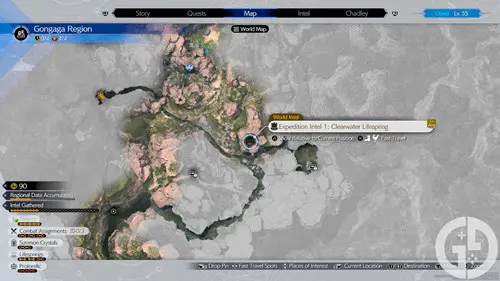
Unlike most of the others, you don't need the Chocobo for this one, and all you need to do is just follow the path of the bird to find it.
#2: Fallbasin Lifespring
This is another one that you'll naturally be able to get while progressing the story, as it's just outside the Gongaga Reactor that Cissnei will direct you towards.
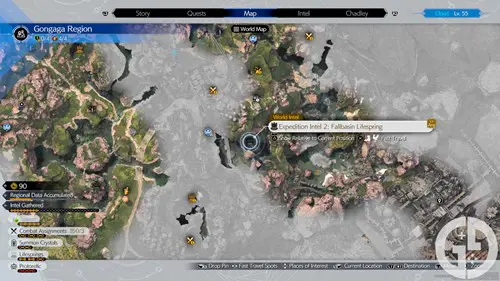
You will have to go off the beaten path a little bit before you head inside, but it's not too far and once again a bird should be able to guide you to the source.
#3: Valefloor Lifespring
From here on out you won't be able to get the rest of the Gongaga Lifesprings until the end of Chapter 9, as they require you to have the Chocobo and access to the rest of the area.
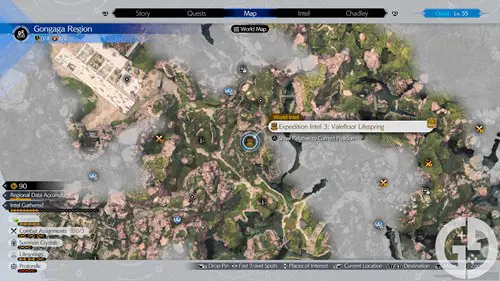
The best way to get to this one is to head southeast from the Gongaga Airstrip, so you might as well hop over and get it before your first ride on Cid's Tiny Bronco.
#4: Grotto Lifespring
While this might look like it's near the Protorelic, you'll actually need to get to it from the western side, across a number of different bridges and then through some water.
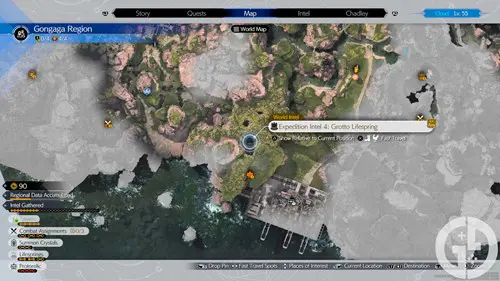
This took me quite a while to find and reach myself, as it's a much longer way than I otherwise expected. Needless to say, I was relieved when I ticked it off!
#5: Holy Ruins Lifespring
Heading up the main road to the right of #4 can lead you to this, but I found it easier to route myself south from the centre of Gonagaga to reach here.
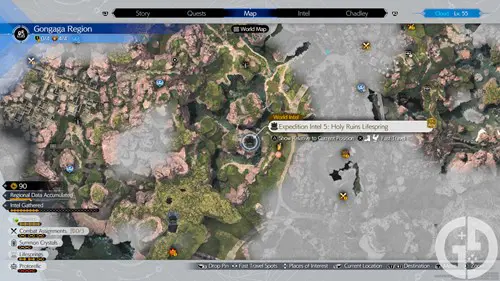
It's even just next to one of the mogstools where you'll spend your Moogle Medals - so don't forget to stop off there too and claim some exciting rewards!
#6: Cavern Lake Lifespring
Thankfully, this final Lifespring is just a few steps away from the fifth, and all you need to do is head to the east.
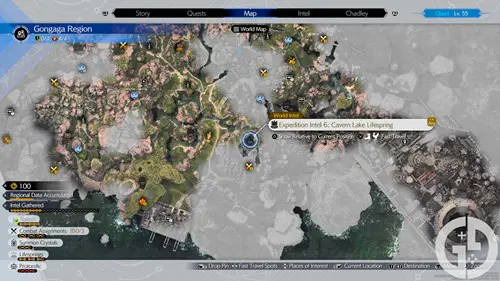
You don't need to take any mushrooms to reach this one thankfully, so just walk around the general area until the bird appears then follow its path to reach the Intel.
Cosmo Canyon Lifespring locations
| Expedition Intel | Location |
| #1 Gulch Lifespring | Right by the Chocobo location |
| #2 Templeway Lifespring | East of Cosmo Canyon Airstrip |
| #3 Dawnvale Lifespring | Southeast of Cosmo Canyon |
| #4 Blustercave Lifespring | Near Launch Point #16 |
| #5 Shrouded Ruins Lifespring | North of Cosmo Canyon |
| #6 Plateau Ruins Lifespring | By the sixth Tower |
#1: Gulch Lifespring
Finding the Chocobo in Cosmo Canyon will leave you a mere stone's throw away from this first piece of Expedition Intel, so don't forget to pick it up while you're over there.
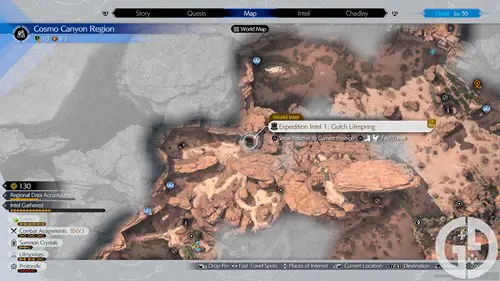
You thankfully don't yet have to master the tricky act of flight - but I'd recommend starting your practice, as many of the next lot will have you soaring through the air.
#2: Templeway Lifespring
You'll need to use one of the nearby air tunnels to hop up onto this next Lifespring, but it's to the east of the airstrip on the western side of the main open area.
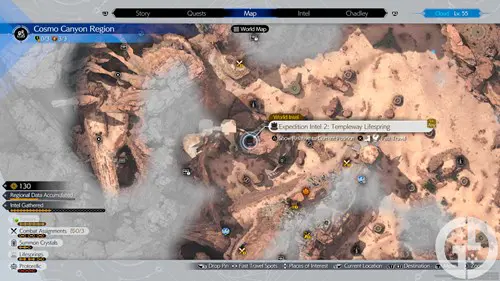
It took me quite a while to figure out what I needed to do here as I was only just getting to grips with the flying Chocobo mechanics, but once you get it going it's only a small flight away.
#3: Dawnvale Lifespring
Right the way to the southeast of Cosmo Canyon you can find the third Expedition Intel, so head on down on Chocoback to find it.
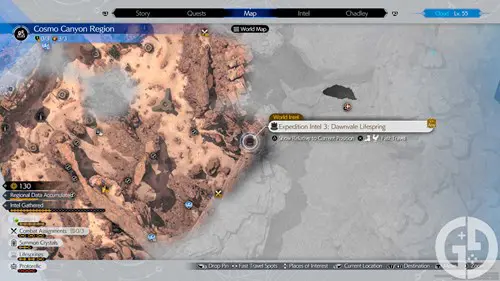
You'll need to take a path up to get this one, but thankfully it's not too complex and requires only a short bit of elevation to reach.
#4: Blustercave Lifespring
You'll have to go on a fairly long journey to reach this fourth one, taking multiple different launch spots in a chain.
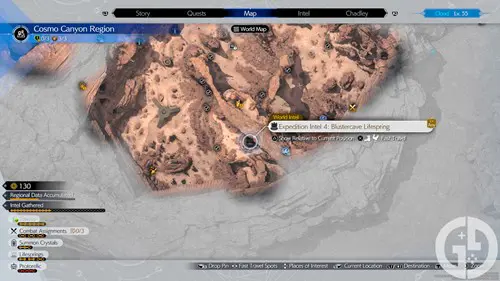
Head on down to the Excavation Intel in the southwest and go up the ramp here. Follow around the different launch spots until you reach the top level near #16, and the Lifespring should be around this area.
#5: Shrouded Ruins Lifespring
This one is one of the few that completely eluded me in my playthrough, and I'm admittedly unable to figure out how to reach it.
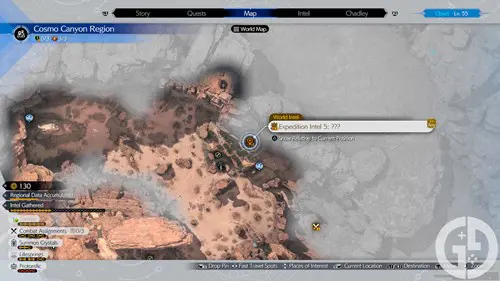
It appears to be on one of the higher levels far above the nearby Tower and Chocobo Stop, and I suspect that you'll have to follow a long path of launch spots to the east or west in order to get there.
#6: Plateau Ruins Lifespring
This is on the same spot as the sixth Tower in the region, and is one of the more complex to reach in the game.
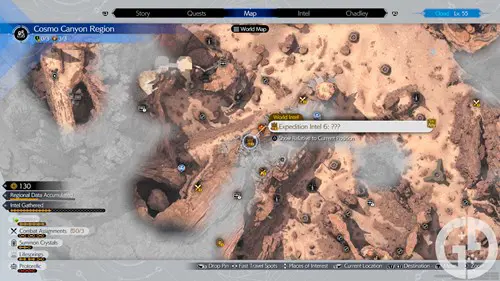
You'll want to follow the path laid out in the fourth Lifespring only to reach launch spot #16 and fly over to the tower from there, making use of the air plumes along the way.
Nibel Lifespring locations
| Expedition Intel | Location |
| #1 Estuary Bluff Lifespring | South Nibel by the zigzag path |
| #2 Gunnthra Terrace Lifespring | East of the Port |
| #3 Coastal Lifespring | West of Nibelheim |
| #4 Delta Island Lifespring | Southwestern Islands |
#1: Estuary Bluff Lifespring
All of the Expedition Intel in Nibel requires you to master the water jet levitation mechanic from this region's Chocobo, which works whenever you're above water.
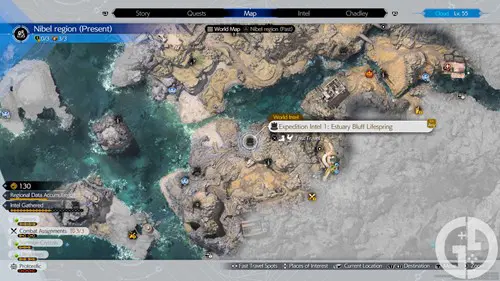
I'm not sure if there's an alternate route to take but I reached this one by heading up the zigzag path to the left of the marker and flying over that way.
#2: Gunnthra Terrace Lifespring
This one is to the east of the port and just to the north of the region's first Protorelic spot.
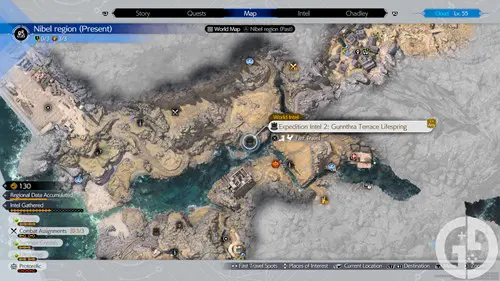
Use your jets to jump up on the river and over to the Lifespring, but be careful not to miss any drops and holes you'll need to enter!
#3: Coastal Lifespring
This is perhaps the most complex and long-winded piece of Expedition Intel in the whole region, but I enjoyed it almost the most.
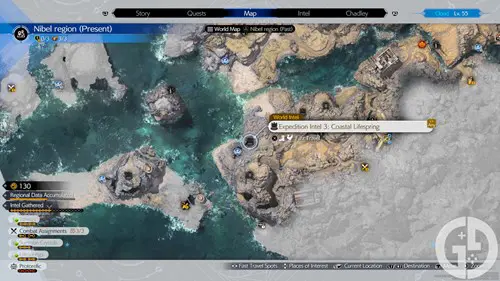
Just to the west of Nibelheim, you'll once again want to use your jets to reach previously inaccessible areas. For this one, you'll need to go across a few paths and around a few caves, but the reward is never too far away.
#4: Delta Island Lifespring
Heading out to the southwestern islands in the Nibel region you'll find the final Lifespring.
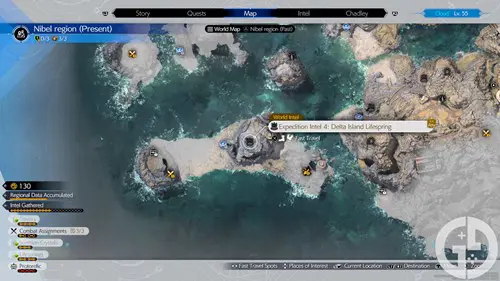
You'll need some serious height for this one so make sure to soar as high as you can with the water jets and get inside the rockface through one of the holes.
What does collecting Lifespring data do?
Collecting Lifespring Expedition World Intel will unlock both Rare Fiends and new Excavation Intel in each specific region. Typically, Expedition Intel will unlock as you complete different Lifesprings within a region, so Gongaga's two, for example, unlock after two and four Expedition Intel unlocks.
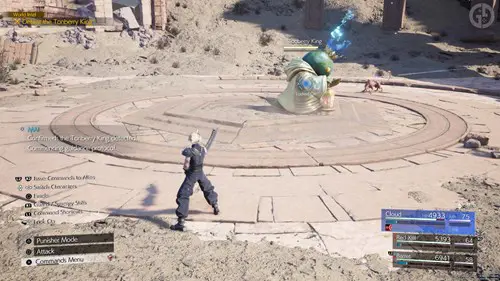
Rare Fiends, on the other hand, unlock only when you have completed all Lifespring data in a region, so you'll need to search them all out if you want to take on the toughest foes like Tonberry King and Quetzalcoatl.
For more from the game, check out all of the best party combinations, best Queen's Blood cards & decks, and all Greens locations to feed Piko.
Otherwise, check out our FF7 Rebirth guides homepage for even more essentials as you continue your journey through Gaia.

About The Author
Ben Williams
Ben is a Senior Guides Writer at GGRecon. Alongside his BA (Hons) in Business Management is a wealth of gaming and entertainment writing experience, having previously occupied roles as a Copywriter in e-commerce at Overclockers and Guides & SEO Writer at GameByte and FragHero. When not whipping up guides and reviews, Ben’ll be off playing the latest Pokemon games, Overwatch 2, Spider-Man, The Witcher, and Final Fantasy - all before reading manga and listening to Ice Nine Kills.


