

Elden Ring Mohg Boss Fight: How To Defeat Mohg, Lord Of Blood
If you need a walkthrough for defeating the Elden Ring Mohg boss, check out how to avoid his moves and what tactics you should employ.
This is part of the ‘Elden Ring’ directory
Directory contents
The Elden Ring Mohg boss fight is one of the Shardbearers, though they are an optional, hidden boss that you likely won't be able to take on until much later in the game due to the difficulty. There are many Elden Ring bosses, with six of them getting the distinction of a Sharbearer, meaning they are more difficult than many others and have a significance in the lore. If you want to know how to defeat the Elden Ring Mohg boss fight and grab their Great Rune, we've got you covered.
If you need a primer on defeating the rest of the Sharbearers, check out:
- Elden Ring Godrick boss fight
- Elden Ring Radahn boss fight
- Elden Ring Morgott boss fight
- Elden Ring Rykard boss fight
- Elden Ring Malenia boss fight
Elden Ring Mohg Boss Fight: Where Is Mohg, Lord Of Blood?

Mohg, Lord of Blood firstly shouldn't be confused with Mohg, the Omen, who is the weaker version found in the sewers below Leyndell. Mohg, Lord of Blood is instead located below Caelid in the Siofra River, and though you can access this whole area quite early from Limgrave, the specific location of Mohgwyn's Palace can't be accessed until much later.
The earliest way of getting there is by finishing the Elden Ring Varre quest, but you should wait until you are at least level 100 to go here. The way that the majority of players will arrive is by going through the teleporter located in the west of Consecrated Snowfield, which is a hidden area in the late game that requires both pieces of the Elden Ring Haligtree Medallion.
Once in the Mohgwyn Palace area, you'll need to make your way through the lake of blood and toward the large building in the area. After climbing up to the top, you'll get a cutscene where you are introduced to Mohg before the fight begins.
- If you want to get one of the alternate endings, check out how to track down the Elden Ring Three Fingers.
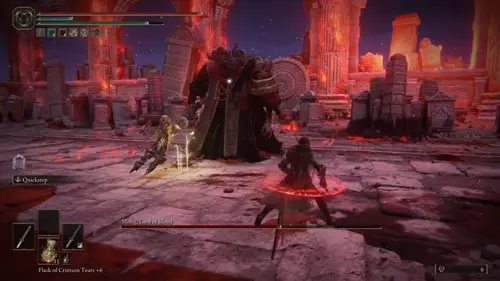
Elden Ring Mohg Boss Fight: Phase One
Like we said, before coming to this fight you should try to reach level 100 at least, though closer to 130 would be a better idea. You should also try to have a fully upgraded weapon so you can deal as much damage as possible. We recommend use of the Elden Ring Black Knife Tiche if you need a summon for this fight, as it will deal out a tonne of damage while also dodging and staying mobile enough to avoid dying early.
Mohg is particularly weak toward the poison status effect, so spells or crafted items that can take advantage of this will allow you to get some extra dot damage in. Another key thing for this fight is the item called Mohg's Shackle, which can be found in the Subterranean Shunning-Grounds below Leyndell. Using this item will allow you to bind Mohg for a short period, letting you get off some free damage.
During the first phase, Mohg doesn't have a tonne of attacks but he can deal a lot of damage with many of them. We recommend keeping close to him when you can to avoid his blood spray attack. When you are up close though, you will need to do a lot of dodging from his trident.
One of his attacks that can take a couple forms is the Blood Claw, which deals initial damage during the swipe and then afterwards during an explosion. The left-handed version can be easily dodged if you roll back, and then roll back again as Mohg will follow up with a trident swipe. There is also a version where he will perform a backhand swipe instead which is slightly faster, and thus, harder to dodge. You can avoid it by rolling back, but you will need to roll forward immediately afterwards to dodge the trident charge.
Another move he can perform will see him stab his trident into the air, before spraying blood around him, so get away from him the second he starts this animation. He will also do a similar version of this where he creates a smaller shower of blood and buffs his next attack.
Sometimes he will also plant his trident into the ground, which will cause AoE damage when he pulls it out. Again, just dodge back from this one to avoid it.
The last thing to worry about for the first phase is the curse mark. This is a random magical ability that Mohg can cast, trapping you within three rings which break sequentially and heal his HP. The only real way of avoiding this is by using the Purifying Crystal Tear with your Flask of Wondrous Physick.
Through this phase you'll want to use as few of your healing flasks as possible due to some of the attacks which come in phase two. Continue learning the patterns of his move we've highlighted above and you should be able to dodge and attack frequently enough. A summon will also make things much easier, giving you the chance to sandwich Mohg between sources of damage.
- Looking for the collectible achievements? Here's our walkthrough of how to find the Elden Ring Legendary Armaments.
Elden Ring Mohg Boss: Phase Two
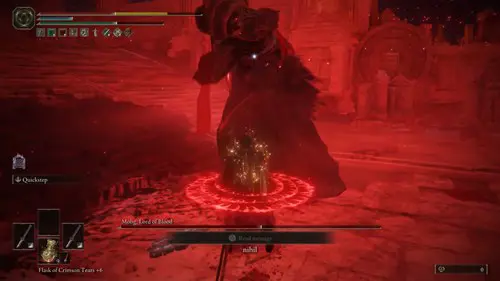
Once Mohg is down to 50% of his HP, he will reach his second phase, which begins with a move that can kill you if you are not careful. He'll raise his trident into the air and the arena will turn blood-red, before shouting 'nihil' three times and healing himself by draining your own HP. Between his shouts you will need to heal to stay alive, but mistime it and your heal will be interrupted. You can also deal damage during this as Mohg won't be able to respond and this will allow you to negate some of his healing, or all of it you are strong enough.
After this, Mohg grows wings and all of his attacks will get a blood and fire buff, meaning they do more damage and have the chance to cause you to bleed, which will take a huge chunk of HP. His moves that cause blood showers will also now create pools of blood fire which you need to avoid.
All of his attacks keep the same timings, so if you are used to the timings they shouldn't provide too much trouble. You will have a new move to watch out for though, as Mohg will perform a long combo with his trident. In this attack, he will first levitate and cast a shower of blood in front of himself before dashing at you and swinging his trident. He'll follow this up with an upwards swing and then plant the trident into the ground, causing an explosion when he removes it. You will need to perform a lot of time-specific dodges for this combo, starting with a roll toward him as he dashes at you, followed by a roll to the side for the next swing, and then two dodges back to avoid the trident plant and explosion.
That's our walkthrough of how to defeat the Elden Ring Mohg boss fight, and now you should be able to deal with his bloodflame attacks and defeat another Shardbearer.
Check out the Elden Ring Sacred Tears locations so you can max out the efficacy of your flasks.

About The Author
Tarran Stockton
Tarran is a Senior Guides Writer at GGRecon. He previously wrote reviews for his college newspaper before studying Media and Communication at university. His favourite genres include role-playing games, strategy games, and boomer shooters - along with anything indie. You can also find him in the pit at local hardcore shows.
This is part of the ‘Elden Ring’ directory
Directory contents


