

Where To Find And Use All Elden Ring Bell Bearings
Elden Ring Bell Bearings are used to expand the inventory of the Twin Maiden Husks, but how do you get more of them?
This is part of the ‘Elden Ring’ directory
Directory contents
The Elden Ring Bell Bearings are items found in various areas of the map that can be traded into the Twin Maiden Husks to expand their inventory at the Roundtable Hold. They are also carried by most NPCs and Nomadic Merchants in Elden Ring and can be dropped by them upon death. For a full guide on where the Bell Bearings can be found in Elden Ring, how to trade them and what items you will unlock in return, read on.
Elden Ring Bell Bearing Uses
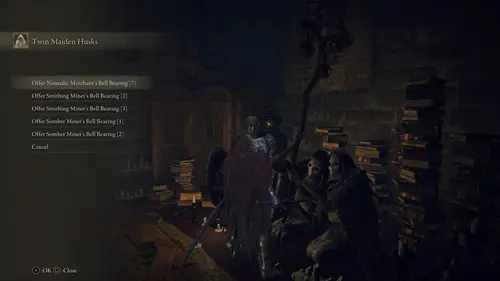
As stated above, the Bell Bearings can be given to the Twin Maiden Husks at the Roundtable Hold in return for an expansion on their stock inventory. These crones can be found along the same hall where the leader of the Roundtable Hold, Gideon Ofnir, resides in his office. Once collected, these can be a great resource for accumulating Smithing Stones and Somberstone Smithing Stones for weapon upgrades.
Some players also choose to kill the various Nomadic Merchants that inhabit the map, in order to collect their Bell Bearings and have one uniform shop with all the items available. This means everything can be found in one place instead of having to traverse the map.
Different merchants have different stock, NPCs will often have their own Bell Bearings that can be retrieved off their corpse if you run into the misfortune of their deaths. Some deaths are preventable, and others are not given the nature of Elden Ring and its unfortunate fate of the world’s inhabitants.
NPCs with questlines will often travel and set up shops in different areas, Patches for example can first be found in the Murkwater Cave but will move around the map as you advance the Volcano Manor quests. Below, we will go into detail where the other Bell Bearings can be found on the map, that being the ones that aren’t on NPCs or Nomadic Merchants.
- For more information on the various NPCs in Elden Ring, including one in particular who has very valuable stock items, read our article on the Most Important NPC That You Shouldn't Kill.
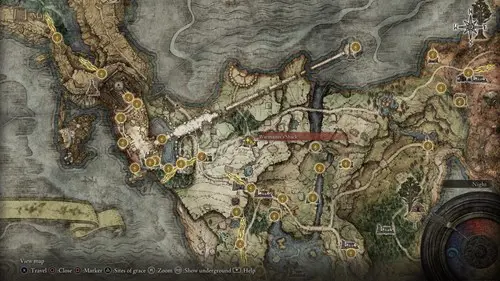
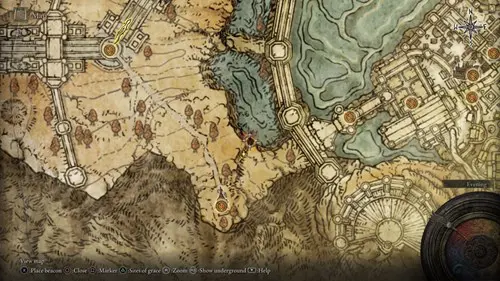
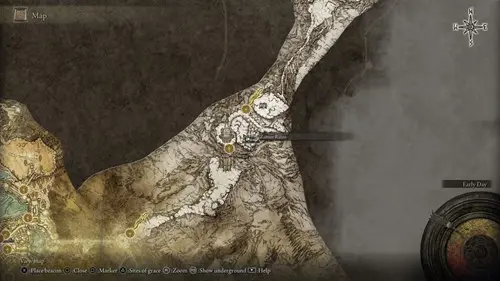
Elden Ring Bell Bearing Locations

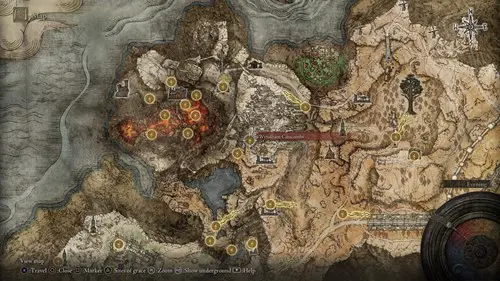
The map above highlights the above ground Bell Bearing locations throughout the map. The numbers next to the accorded color symbolize the rank of bearing, eg. Somberstone 1 is marked as cyan 1 in the Caelid region.
Bone Peddler’s Bell Bearing
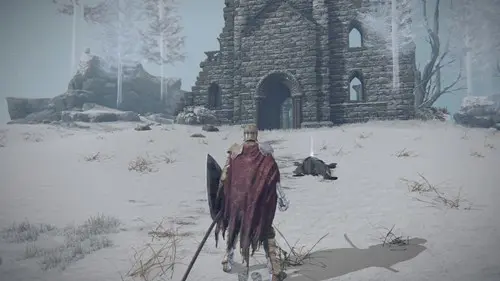
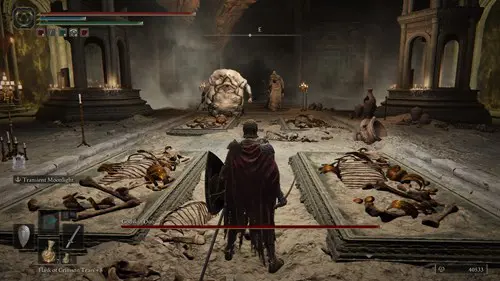
This is the reward for beating the Bell Bearing Hunter Boss at the Warmaster’s Shack in Limgrave. The fight happens at night so if he doesn’t spawn right away, rest at the nearby Site of Grace and he should appear. You also receive 2,700 runes for beating him. He’s a low-level boss so shouldn’t give you much trouble, but his sword does levitate from out of him, so he does have a lot of reach and the ability to inflict bleed damage. This Bell Bearing unlocks Thick Animal Bones and Heft Beast Bones for purchase.
Somberstone Miner’s Bell Bearings
These unlock the ability to purchase Somber Smithing Stones, the levels of which scale to the number attributed to the Bell Bearing. These are used to upgrade special weapon and shield types.
Somberstone Miner’s Bell Bearing (1)
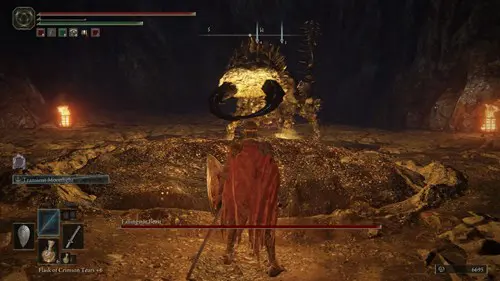
Rewarded for beating the Fallingstar Beast Boss in the Sellia Crystal Tunnel. This cave area is in the Caelid region, South-East to the Deep Siofra Well. This boss area can be easily missed as you have to jump from the shack structures to a gap behind one of the blocked off shacks, avoiding the attacks from the Prawn Miners on the way. Along with the Bell Bearing, the boss will also drop 7,600 runes, Smithing Stone (7), Gravity Stone Chunk x5 and Somber Smithing Stone (6).
Somberstone Miner’s Bell Bearing (2)
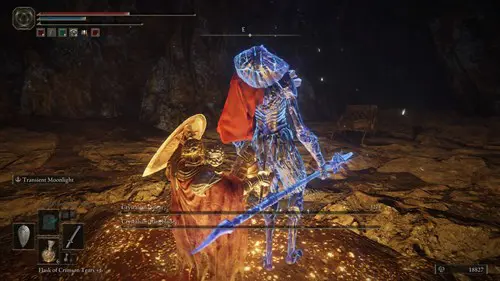
Rewarded for beating the Crystalian Spear and Ringblade bosses in the Altus Tunnel. The Altus Tunnel can be found directly south of the Minor Erdtree on the Altus Plateau. The two bosses attack together, so Spirit Ashes are vital to help with crowd control. They can be poise broken which is a bonus and upon death they also give the player 9,000 runes.
Somberstone Miner’s Bell Bearing (3)
Located on a corpse outside the entrance of the First Church of Marika in the Mountaintops of the Giants. This area can be hard to navigate as it is all different levels, an easy way to get to the church is by travelling East from the Lord Contender’s Evergaol, down the slopes and around the icy lake. There will be a few non-hostile jellyfish around the church to look out for if you get lost.
Somberstone Miner’s Bell Bearing (4)
Found in Crumbling Farum Azula which will require you to advance to the Forge of the Giants and speak to Melina first, before gaining access there. The Bell Bearing is on a corpse immediately North at the Tempest-Facing Balcony Site of Grace.
- To get to the Forge of the Giants you'll have to face the Fire Giant first. Here's our Fire Giant Boss Guide for everything you need to know to beat him.
Somberstone Miner’s Bell Bearing (5)
Located in the North of Crumbling Farum Azula, after you have defeated the Godskin Duo bosses, follow the ruins that act as platforms to jump between areas. The Bell Bearing will be on a corpse in a church being guarded by an Azula Beastman enemy. Be sure to pick up the Ancient Somber Smithing Stone along the way. It will be in the middle of a gazebo to the left of a dragon that is guarding the way forward.
- Now you're in Farum Azula territory, check out our guide on defeating the boss there. Our Elden Ring Beastman of Farum Azula Boss Guide.
Smithing Stone Miner’s Bell Bearings
These unlock the ability to purchase Smithing Stones from the Twin Maiden Husks, the levels of which scale to the number attributed to the Bell Bearing. These are used to upgrade regular weapon and shield types.
Smithing Stone Miner’s Bell Bearing (1)
Rewarded for defeating the Crystalian Boss located in the Raya Lucaria Crystal Tunnel, North of the Church of Vows. This boss sends out projectiles and has a high damage spin attack. It is the same form as the previous Crystilian boss in the Altus Tunnel which means it is available to critical attacks. Upon defeat it will drop 3,000 runes and the Bell Bearing.
Smithing Stone Miner’s Bell Bearing (2)
Located in a chest in the Sealed Tunnel. The Sealed Tunnel is located in the Altus Plateau slightly North-East of the Minor Erdtree Church and West of the Divine Bridge Site of Grace. This tunnel has multiple fake walls, identifiable by the change of stone texture.
If you progress past the chest, there is a Stonesword Key, Abductor Virgin and boss fight against the Onyx Lord who drops 16,000 runes and the Onyx Lord Greatsword upon defeat. Past this boss area will also uncover a path leading towards the Tower of Altus where you can restore Rykard’s Great Rune to power.
Smithing Stone Miner’s Bell Bearing (3)
Located within the Zamor Ruins behind a movable door, in the Mountaintops of the Giants. This Bell Bearing doesn’t require a boss fight or much exploration to find, but it will require you to get past many Knights of Zamor that patrol the area.
Smithing Stone Miner’s Bell Bearing (4)
Rewarded upon defeating the Godskin Duo in Crumbing Farum Azula. This is the Godskin fight you may have experienced earlier on the path to Volcano Manor, except this time he has a companion that is slimmer and can expand his neck like a snake. Spirit Ash summons are vital here for splitting the attention of both bosses so they are not solely attacking you.
- For more tips on how to tackle the Godskin as an enemy, read our Elden Ring Godskin Boss Guide.
Ghost-Glovewort Picker’s Bell Bearings
These unlock the ability to purchase varied levels of Ghost-Glovewort from the Twin Maiden Husks. Ghost-Glovewort is a flower used to upgrade rarer, renowned ashes by Roderika at the Roundtable Hold.
Ghost-Glovewort Picker’s Bell Bearing (1)
This is found just beyond the entrance of Nokron, Eternal City and the Site of Grace with the same name. The Bell Bearing is on a corpse to the left of the gazebo in the city centre. To get to Nokron and this initial Site of Grace you will have to beat Starscourge Radahn first, which will unlock the path into the city.
Ghost-Glovewort Picker’s Bell Bearing (2)
At the Nokstella, Enternal City Site of Grace, turn left up the staircase. Take the second landing to the left and there will be a room full of Silver Tears. Although these enemies are slow they have a devastating pincer attack so stay clear from their fronts. In this room to the left of the statue there is a chest that contains the Bell Bearing. However, access to this initial Site of Grace will require you to have advanced Ranni’s questline.
- For tips on how to complete Ranni's quest and get to Nokstella, read our Elden Ring Ranni Questline Guide.
Ghost-Glovewort Picker’s Bell Bearing (3)
Located in the Halingtree Elpael village graveyard. To unlock access to Halingtree you will first have to located both halves of the medallion. One half is with a man in the Village of Albinaurics, who is disguised as a pot. He will instruct you to see Latenna at the Slumbering Wolf Shack who will then guide you to the other medallion half.
Glovewort Picker’s Bell Bearings
These unlock the ability to purchase varied levels of Glovewort from the Twin Mainden Husks. Glovewort is a flower used to upgrade spirit summon ashes by Roderika at the Roundtable Hold.
Glovewort Picker’s Bell Bearing (1)
Rewarded upon defeating the Erdtree Burial Watchdog boss in the Wyndham Catacombs. The catacombs are located near the Volcano Manor region and like other catacombs on the map, has a host of pressure plate traps and moving sawblades to look out for. The enemies inflict lightening damage, including the boss who is the same similar shape as many other Watchdog bosses found in catacomb locations. Meaning it has the same jump animation and primarily uses a giant stone sword. Defeating the boss will also award you with 12,000 runes.
Glovewort Picker’s Bell Bearing (2)

Rewarded upon defeating the boss in the Giants’ Mountaintop Catacombs. These catacombs are off the beaten track and can be easily missed. If you travel the main path East of the Zamor Ruins Site of Grace, there is a bridge that is littered with enemies. Turn right instead of continuing to the bridge and there will be the entrance to the catacombs hidden away. Inside the catacombs you’ll have to navigate your way through winding passageways and past Fanged Imps and Living Jars.
This shouldn’t cause too much trouble if you avoid being ganged up on. Once the main doors are open, you’ll have to face the Ulcerated Tree Spirit to acquire the Bell Bearing. This boss is essentially a quivering mass of tree limbs that deals knockback damage. It also has a sweep attack with its tree branch tail and various grabbing attacks including one with its mouth which is high damage. The best way to deal with this boss is by getting close to it to avoid the grab attacks but looking out for its Holy Flame attacks. The boss can be afforded a critical hit in its eye if enough damage is done. Upon defeating the boss, along with the Bell Bearing, the player receives 48,000 runes and a Golden Seed. A chest will appear with Deathroot inside.
Glovewort Picker’s Bell Bearing (3)
Located on a corpse inside a gazebo in the Crumbling Farum Azula. From the Crumbling Beast Grave Depths Site of Grace, travel through to the courtyard and the platform that can be raised. Take the platform down and travel left until you reach a plateau with the gazebo on it, careful to avoid the Lesser Wormface enemies there as they can inflict Blight damage.
Now you've found all of the Bell Bearing locations, why not move onto Golden Seeds? Here's our Elden Ring Golden Seeds guide for all the locations of the Golden Seeds in the game, needed to upgrade your health flasks.

About The Author
Kiera Mills
Kiera is a former GGRecon Guides Writer.
This is part of the ‘Elden Ring’ directory
Directory contents


