Final Fantasy 14 P3S Savage: Asphodelos The Third Circle Raid Guide

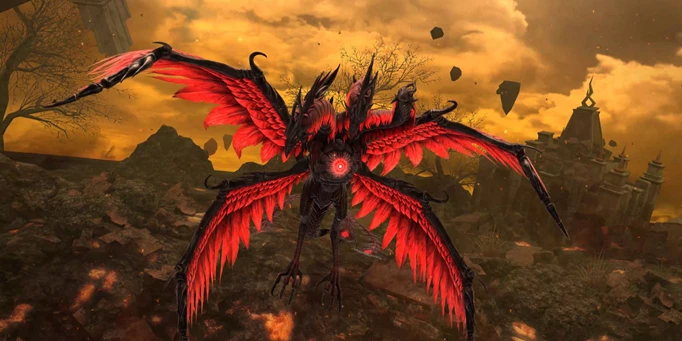
In the Final Fantasy 14 P3S Savage fight, the Asphodelos: The Third Circle raid, players will find themselves facing off against the Phoinix, a formidable firebird, in a fight many consider to be the expansion’s first truly testing encounter. In order to clear, Final Fantasy 14 players must navigate through intricately complex movement mechanics, manage DPS checks throughout the fight, and ultimately maintain damage uptime in a fight that requires a serious amount of focus and adjustment. Newcomer or veteran alike, check out this guide to help you clear the third fight in Final Fantasy 14: Endwalker’s Pandæmonium raid series.
Still stuck on beating the previous raid phases? Take a look at these guides:
Final Fantasy 14 P3S Savage: First Phase
Before the start of the fight, you can assign light parties, consisting of one healer and one tank, paired with another DPS player. This will be used to resolve most major mechanics.
 Click to enlarge
To start off the fight, Phoinix will have to be held north of the arena’s center, while he casts Scorched Exaltation a raid-wide AoE, and Heart of Condemnation a unique tankbuster that requires both tanks to grab tethers and stand to the side to resolve the high damage AoEs. Following the resolution of the tankbuster, the party should group center for the following Experimental Fireplume.
Experimental Fireplume will either cover the center of the arena in a circle AoE, that can be avoided by going north, or AoE’s on the outer edge of the arena into a center AoE, that can be avoided by going Northwest once that area becomes safe. You can tell which one the boss will perform based on a large circle flair appearing on the boss’s model, or multiple small flares. The following is Right or Left Cinderwing, which will cover either side of the boss in a room-wide AoE. Simply stand on the opposite side to avoid the blast.
Next, is Darkened Fire, which will require the use of the light parties set earlier. Stand in between the spaces of each dark fire with your partner and wait for an overhead to get assigned to your character. Based on the number given, you can head to an area designated in the following graph. Once each darkened fire has been blasted at least 4 times, you need to kill the fire immediately in order to avoid death.
Once the mechanic is resolved, the boss will eventually leave the arena and stand out of bounds to the east side to cast Trial of Condemnation. What follows is an arena AoE blast followed by targeted AoEs depending on the mechanic. Depending on the heads activated on Phoinix’s model, players will either stand center spread out in their light parties or stand on the edges of the arena spread out to avoid overlapping circle AoEs. A center head glow will lead to the former, and a left and right glowing head will lead to the latter.
Final Fantasy P3S Savage: Second Phase
Next, is an adds phase, where four Sunbirds spawn, that will each need to be dealt with in certain areas of the arena. Tanks will need to grab two Sunbirds each and carry them to the north and south arena respectively and will have to kill one in that initial position. Once one Sunbird dies, rotate the remaining Sunbird clockwise to the east or west.
You must only kill one Sunbird per spot, or it will most likely cause a wipe. Once the Sunbirds have been killed, Phoinix will resurrect them with Flames of Undeath and start the next mechanic. To prepare for this, stand next to a dead Sunbird with your light party partner, with one player on each side of the model.
With the Sunbirds resurrected, they will begin to cast Fireglide Sweep, where they tether to two players and will proceed to dash towards one after the other. Every player will be tethered to a bird, and the player who is tethered first needs to stand on the opposite side of the arena to ensure that the distance between them and the bird, minimizes the incoming damage.
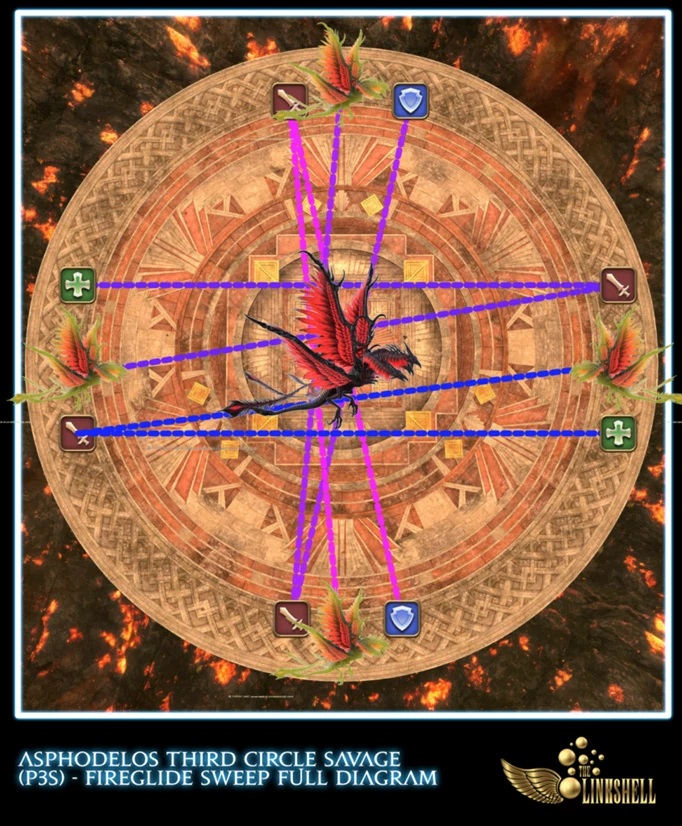 Click to enlarge
The second tethered player will stand opposite their partner, so that both tether lines glow purple to showcase enough distance stands between them. Be sure to avoid getting hit by other Sunbirds as they fly by, so after you’ve been charged, move to the side slightly to avoid extra damage.
Next, each bird will need to be dealt with in the same manner as before. Taken to the north and south, one bird killed there, and then another in the east and west. This is a DPS check, so the birds need to be killed before the enrage timer goes off, or it will wipe the party. Phoinix will then cast Dead Rebirth, which is a heavy damage raid-wide. Shield and mitigate to survive.
Final Fantasy P3S Savage: Third Phase
Now, in Phase III of the fight, Phoinix will now have four small adds around them, which will target the second highest enmity player throughout the rest of the fight with auto-attacks. Once that mechanic has been introduced, Phoinix will cast Fledgling Flight, which targets four players with a floating market, that will lead to a placed AoE that blasts damage in a cone. To resolve, point the potential cone AoE outward to the NSWE. Once they’ve been placed, everyone stacks in the center.
Experimental Gloryplume¸ will implement an Experimental Fireplume as seen earlier in the fight along with a new mechanic, that will come in the form of a singular big dark orb, or a ring of small dark orbs. If it’s only a ring of dark orbs, every party member will be marked with a small circle AoE, and only need to spread to resolve. If it’s a large dark orb, you will need to split into light parties with a tank and healer in groups of four to share the incoming damage.
Following this comes the most challenging couple of phases of this raid tier so far.
To start, the boss will implement Fountain of Fire which spawns two circle markers at N/S or E/W, which will then rotate clockwise. Both healers will need to stand in each circle marker and tank the damage, but in doing so will buff their healing potency, allowing them to resolve the mechanic with ease.
Next, comes a series of attacks called Sun’s Pinion. Phoinix will mark the two closest players with AoE markers, and once they go off, Sunbirds will a spawn and tether to the marked player, where you will then need to run as far as possible to max out the tether, resolving the mechanic. This will happen also the remaining two sets of closest pairs.
While it’s easier said than done, you can land the AoE’s and max out the tethers by rotating the AoE placements, clockwise along the arena. So, the tanks will place the AoE’s and max out the tethers to the N/S, the following two closest DPS players to the NE/SW, and the final two players in the E/W. Being sure to avoid overlapping damage from the Sunbird tethers. Once finished, shield and heal for the upcoming raid-wide.
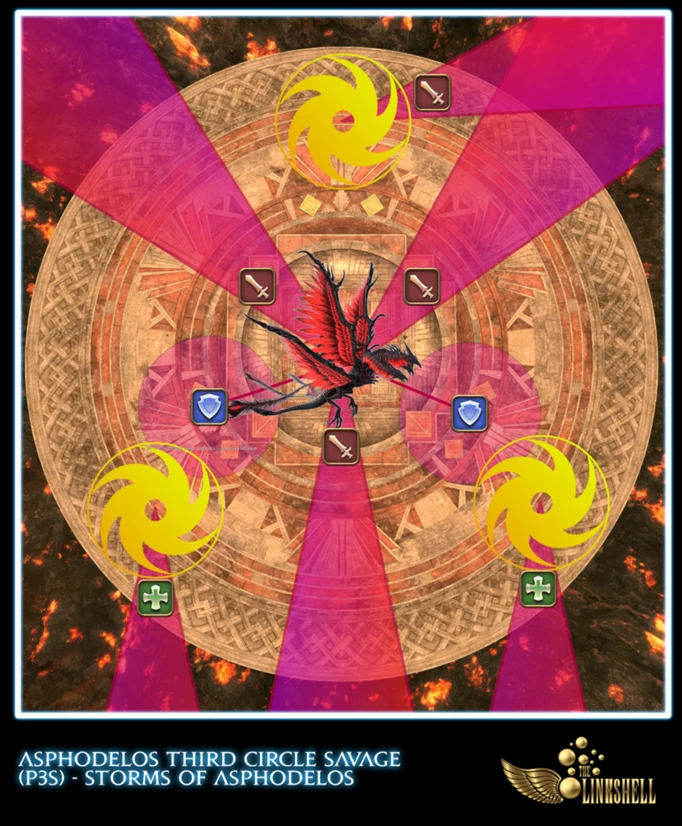
Up next is Firestorms of Asphodelos, which spawns three twisters in the arena to form a triangle. Following this is Flames of Asphodelos, three conal cleaves that will need to be pointed away from the party, with a follow-up Experimental Ashplume.
Next, the twisters will target the three closest players with another conal aoe. That need to be pointed away from the party. At the same time is another tether tankbuster, and three AoE’s on the remaining three players. Make the AoE’s face outward, along with resolving the tankbusters, to successfully get past this part of the fight.
After this, the boss will tether to all three twisters, but only one tether will be purpled. The party needs to stand on either side of the purpled twister, as it will cast a knockback. The party will be pushed to just within range of the safe zones for each of the other two twisters, resolving the mechanic.
 Click to enlarge
Searing Breeze will be a set of baited AoEs that the party will have run alongside the arena to resolve.
Final Fantasy 14 P3S Savage: Fourth Phase
Finally, the last major mechanic in the fight is Death’s Toll. Which will mark every player with a one, two, or four marker debuff. The Sunbirds will again make a reappearance, this time however, they will remove a stack of Death’s Toll with each hit, meaning you’ll want to get with with any additional Sunbird paths to get rid of the debuff.
Lastly, is a healing potency decrease from the resolution of Death’s Toll, and the party will need to be healed to full to ensure survival against Life’s Agonies, a heavy ride-wide AoE.
Once that final mechanic is resolved, nothing new will showcase, and it’s all about beating the enrage timer.
