Destiny 2 Extraction: How To Complete The Master/Legend Lost Sector

Destiny 2 Extraction is one of the new lost sectors in the game, found in the Quagmire region of Savathun’s Throne World. Destiny 2 lost sectors are an important part of the game, as completing them on higher difficulties is how you go about gaining new exotic armour. There is a different 'lost sector' designated every day to be the 'Master' or 'Legend' lost sector. Here is everything you need to know to complete the Destiny 2 Extraction lost sector on Master or Legend difficulty.
- Thinking of stepping up to the new raid challenge? Check out our Destiny 2 Vow of the Disciple raid guide for some tips.
Destiny 2 Extraction: Preparation
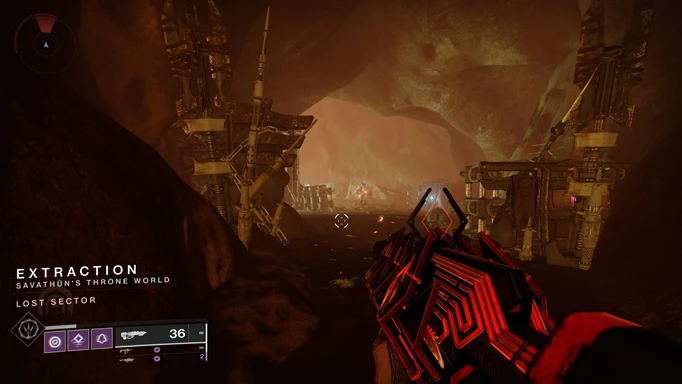
 Click to enlarge
As is tradition with Master or Legend lost sectors, we have Match Game, Extra Shields, and Locked Equipment to contend with. This means more enemies have shields and those shields are incredibly hard to break without using the right type of damage. You need to make sure you bring the right weapons in for that, as Locked Equipment means you cannot change your gear once you start.
Speaking of shields, you will be coming up against Arc and Void shields during this lost sector, so prepare for that. Arc should be your focus, as this lost sector has an Arc burn. It’s the player’s choice, but having an Arc heavy weapon with an Arc subclass is usually a good idea for making the most of the extra damage. The final modifier is Raider Shield, simple enough, just means that Raiders now have shields.
- Want to know more about the Guardian Games reward weapon? Check out our Destiny 2 The Title SMG guide.
Destiny 2 Extraction: Strategy
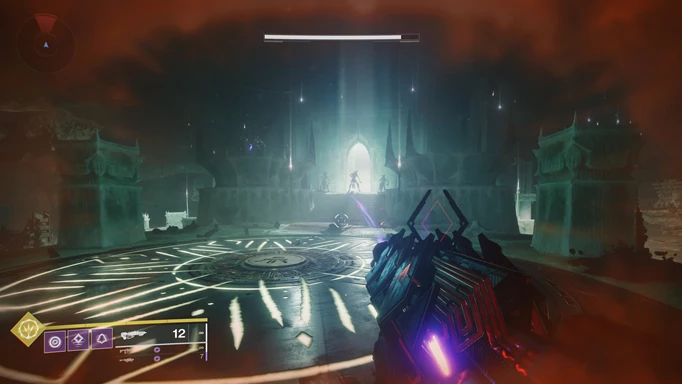 Click to enlarge
The first room you enter in this lost sector is a wide-open room with several levels and many enemies. There isn’t much cover here, or opportunities to use distance, so you will need to be fast and efficient. For this, it would be a great idea to have an SMG, and considering you need a Void weapon in this lost sector, Funnelweb or a good roll on The Title would be ideal. Stay mobile, and take out the enemies in the room. Use the multiple levels of elevation to keep them guessing, and you shouldn’t have too much trouble. The main issue is the Overload Chieftain, who will appear on the left side of the room. You can use the corner as cover from him, but be sure to take him down as soon as you can.
Once those enemies are dealt with you are free to move into the next room, which is a bit of a madhouse. There are both Scorn and Hive here, fighting each other when you arrive. Use the right side of the room to stay out of the fray, and take out enemies from safety. More enemies will file in from the other side of the room, including an Unstoppable Ogre. Keep away from it until you are ready to take it down, and when you are, stun it with Unstoppable Rounds and hit it with your heavy weapon. An Arc rocket launcher would be ideal, especially Wardcliff Coil as it can kill the Ogre in only two hits. When the Ogre is down you can focus on your main task, activating the three floor plates in the room.
There isn’t an easy way to do this, you just need to meet the challenge head-on. Stand on the first plate under the ledge to begin the process. Be wary of the Knights that will attack you while you do this, they have Arc shields and rush in with swords, so try not to blow yourself up if you use your rockets. Waves of enemies will attack as you stand on the plates, you just need to keep them at bay while it activates. There are barricades you can use for cover, so keep moving to block lines of sight from enemies. The middle plate is the most exposed, with enemies on all sides, so stay on your toes. There is no harm in getting off the plate when it is too hot, and getting back on once you have dealt with a few of the enemies.
Once all three plates are finished, you can make your way forward. The door is directly ahead of the middle plate, head down the corridor and to the right. In this final room, there are Hive enemies on the platform above you. Again, there is little to no cover in this room, so you need to stay on your toes. You will have Knights, Acolytes, and Thrall to contend with. The boss here is a Lightbearer Wizard, meaning it will hit you with the same extra Arc damage that you have available to you. Try not to kill it unless you are certain you will be able to grab its ghost and finish it for good. Clear the room, then grab your reward.
That is everything you need to do to complete the Destiny 2 Extraction lost sector on Legend or Master difficulty. For more tips on the game, why not check out our Destiny 2 Lost Sectors guide.