Best Call of Duty Mobile Controller Settings Guide

Call of Duty: Mobile is slowly but surely moving into a fully-fledged Call of Duty experience that we’ve come to love over the years. As the game gets continuously updated, the Battle Royale mode is getting closer to the Warzone experience, and the ranked experience already resembles the console and PC version to a decent degree. The game has become a sweet alternative for those on the road that still want to play some rounds with the squad. For the more authentic feeling, an update brought the mobile version even closer to the beloved Call of Duty experience.
Since the update on November 24, 2019 Call of Duty: Mobile has introduced full support for controllers with Bluetooth connectivity such as the Xbox, the PS4 controller, or one of the several dedicated mobile controllers on the market. Developer TiMi Studios has made sure that players who use the controllers will be matched with other controller players to even the playing field.
Setting up is easy enough to do, but there are some tricks to optimising your controller so you can get right into the action at full-capacity from game one.
Pairing up
Starting off, head to your Call of Duty: Mobile app and go to settings. Head to the “Controller” part of the menu and make sure that you have “Enable Controller Support” switched on. The indicator next to “Connect Controller” should show that it’s not connected at this point, so no worries there. Keep this in mind as we’re coming back to it to check later.
To setup a controller on Android and iOS, make sure to set the controller of your choice into pairing mode. For the wireless Xbox controller, it is a button on top of the device right next to the charging slot.
For the PS4 controller, it’s just slightly more tricky as it requires you to hold down the play and the share button for a couple of seconds at once. You’ll know that it worked when the lights on top of the device start flashing. First Generation PS4 controllers are unfortunately not supported.
For less common devices, we refer to the manual. Everything that gets you into the pairing mode so your device may show up in your Bluetooth settings on your phone gets the job done.
Once the controller is set into pairing mode, we turn our attention to the device we want to play on. Whether it is a tablet or a mobile phone, head towards settings, look for Bluetooth (might be categorised under connections on some UIs) and turn Bluetooth on.
After a couple of seconds, your device should be showing you a list of Bluetooth devices in your immediate vicinity, one of which should be your chosen controller. Click on the device and wait for a couple of seconds. Sometimes the connection will fail on the first and second try, so trying a couple of times before beginning to troubleshoot the issue is advised. Keep in mind that you have to keep the controller into pairing mode, which may require to press the aforementioned buttons on your controller once more.
Now head back to your Call of Duty: Mobile app and head back to Settings > Controller. The controller should now show “Connected.” If this is not the case, start again from step one, as it is most likely the case that your controller has lost connection with your phone.
 Click to enlarge
Configuring your controller settings
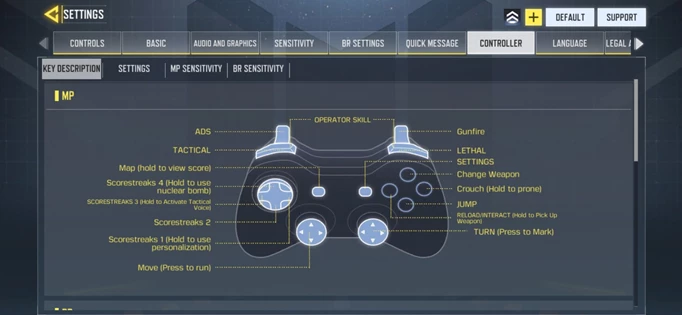
Starting out to configure your controller in the best possible ways, familiarise yourself with the key mapping under Controller > Key Description. Here you’ll be able to say all the binds that are currently set as default.
Going over once more to “Settings” in the controller menu, we can begin setting up. Here are the best options for your controller setup, though you, of course, may customise them according to your own preferences. Our settings will get you the closest to the settings you’d find as the default in your console Call of Duty experience.
X-axis FLIP - Default
Y-axis FLIP - Default
Flip triggers with bumpers - Default
Tap ADS - Hold
Auto-Sprint - Off
Sprint function - Push left joystick forward
Now that we’ve got the basic settings out of the way, we can head to the meat and potatoes of these settings.
Sensitivity
While the gameplay of the different game modes differs, we still advise you to keep all your game modes at the exact same settings to get used to your controls. Any advantage you may gain by having different settings will very likely be off-set by you not feeling practised on all of the different settings in each game mode.
We advised toying around with your sensitivity in practice vs. AI matches to make sure you’re ready to fight it out with other players on settings you are happy with. The following sensitivity settings are ranges that most good controller players stick to. The game’s own presets work well to give you a general direction and quickly switch to very different styles when trying them out in practice.
Horizontal Sensitivity - 120 - 150
You’ll be moving a lot on the X-axis and due to flexible spawns, a game like Call of Duty: Mobile will require frequent 180° turns, though accuracy needs to be taken into account. Considering that we can set up the scope accuracy independently, we don’t need to go too slow here.
Vertical Sensitivity - 120 - 150
Just to have a symmetrical experience, we should keep the horizontal and vertical sensitivity close to each other as to help build up muscle memory.
ADS & Non-Scope horizontal Sensitivity - 80 - 100
Scope Horizontal Sensitivity - 80 - 100
Scope Vertical Sensitivity - 80 - 100
Sniper ADS Horizontal Sensitivity 50 - 80
Sniper ADS Vertical Sensitivity 50 - 80
Here is where we take our accuracy back. Since you’re likely to use the sniper on longer distances where more accuracy is needed as your targets are smaller, it makes sense to go lower with them. This is especially true in Battle Royale.
This is it for our Call of Duty: Mobile controller settings guide. Keep up with guides and more here at GGRecon!
Images TiMi Studios